Connecting Snowflake to Bicycle
Connect to Snowflake for cloud data warehousing and analytics.
Requirements
To follow the steps in this guide, you'll need:
- Permission to create connectors in Bicycle
- Snowflake administrative access (or coordination with your Snowflake platform team) to create a service user, grant read access, and configure authentication
- If your Snowflake account restricts access by IP address, allow Bicycle network access before connecting
Prepare Snowflake access
Complete these steps once, regardless of which authentication method you use in Bicycle.
Create a service user and grant access
Create a dedicated service user for Bicycle. Do not use personal Snowflake credentials for production connections.
- Sign in to the Snowflake Web UI with an account that can create users and roles.
- Open a worksheet and run the SQL below. Replace placeholders with values from your environment. Use the option that matches the scope Bicycle needs.
-- Option 1: One Database And One Schema
-- Use this when Bicycle should access all current and future tables/views in one schema.

USE ROLE ACCOUNTADMIN;

CREATE ROLE IF NOT EXISTS bicycle_role;
CREATE USER IF NOT EXISTS bicycle_user;
GRANT ROLE bicycle_role TO USER bicycle_user;

ALTER USER bicycle_user SET DEFAULT_ROLE = bicycle_role;
ALTER USER bicycle_user SET TYPE = SERVICE;
ALTER USER bicycle_user SET DEFAULT_WAREHOUSE = <warehouse>;

GRANT USAGE ON WAREHOUSE <warehouse> TO ROLE bicycle_role;

GRANT USAGE ON DATABASE <database> TO ROLE bicycle_role;
GRANT USAGE ON SCHEMA <database>.<schema> TO ROLE bicycle_role;

GRANT SELECT ON ALL TABLES IN SCHEMA <database>.<schema> TO ROLE bicycle_role;
GRANT SELECT ON FUTURE TABLES IN SCHEMA <database>.<schema> TO ROLE bicycle_role;

GRANT SELECT ON ALL VIEWS IN SCHEMA <database>.<schema> TO ROLE bicycle_role;
GRANT SELECT ON FUTURE VIEWS IN SCHEMA <database>.<schema> TO ROLE bicycle_role;

-- Option 2: One Database And All Schemas
-- Use this when Bicycle should access all current and future schemas in one database.

USE ROLE ACCOUNTADMIN;

CREATE ROLE IF NOT EXISTS bicycle_role;
CREATE USER IF NOT EXISTS bicycle_user;
GRANT ROLE bicycle_role TO USER bicycle_user;

ALTER USER bicycle_user SET DEFAULT_ROLE = bicycle_role;
ALTER USER bicycle_user SET TYPE = SERVICE;
ALTER USER bicycle_user SET DEFAULT_WAREHOUSE = <warehouse>;

GRANT USAGE ON WAREHOUSE <warehouse> TO ROLE bicycle_role;

GRANT USAGE ON DATABASE <database> TO ROLE bicycle_role;
GRANT USAGE ON ALL SCHEMAS IN DATABASE <database> TO ROLE bicycle_role;
GRANT USAGE ON FUTURE SCHEMAS IN DATABASE <database> TO ROLE bicycle_role;

GRANT SELECT ON ALL TABLES IN DATABASE <database> TO ROLE bicycle_role;
GRANT SELECT ON FUTURE TABLES IN DATABASE <database> TO ROLE bicycle_role;

GRANT SELECT ON ALL VIEWS IN DATABASE <database> TO ROLE bicycle_role;
GRANT SELECT ON FUTURE VIEWS IN DATABASE <database> TO ROLE bicycle_role;

-- Option 3: Specific Tables And Views Only
-- Use this when Bicycle should access only selected tables/views in a schema.

USE ROLE ACCOUNTADMIN;

CREATE ROLE IF NOT EXISTS bicycle_role;
CREATE USER IF NOT EXISTS bicycle_user;
GRANT ROLE bicycle_role TO USER bicycle_user;

ALTER USER bicycle_user SET DEFAULT_ROLE = bicycle_role;
ALTER USER bicycle_user SET TYPE = SERVICE;
ALTER USER bicycle_user SET DEFAULT_WAREHOUSE = <warehouse>;

GRANT USAGE ON WAREHOUSE <warehouse> TO ROLE bicycle_role;

GRANT USAGE ON DATABASE <database> TO ROLE bicycle_role;
GRANT USAGE ON SCHEMA <database>.<schema> TO ROLE bicycle_role;

GRANT SELECT ON TABLE <database>.<schema>.<table_1> TO ROLE bicycle_role;
GRANT SELECT ON TABLE <database>.<schema>.<table_2> TO ROLE bicycle_role;

GRANT SELECT ON VIEW <database>.<schema>.<view_1> TO ROLE bicycle_role;
GRANT SELECT ON VIEW <database>.<schema>.<view_2> TO ROLE bicycle_role;
Retrieve your Snowflake account identifier
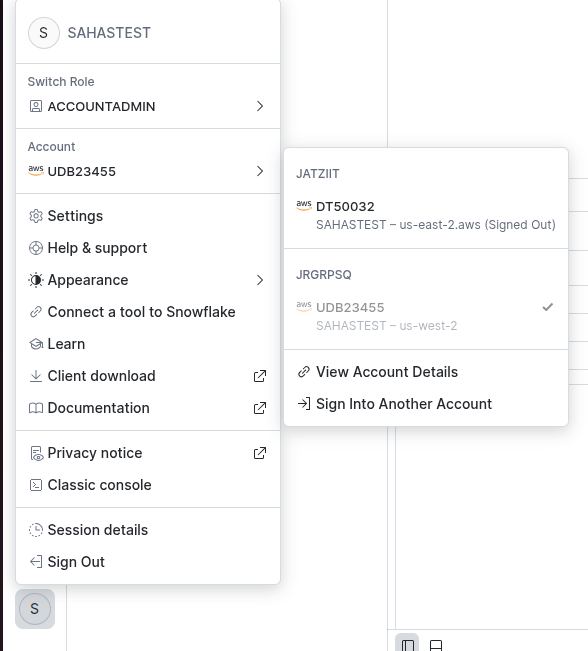
- In Snowflake, click your user icon in the bottom-left corner of the page and hover over Account.
- Click View account details.
- In the Account Details dialog, locate and copy the Account identifier value (for example,
ORGNAME-ACCOUNTNAME).
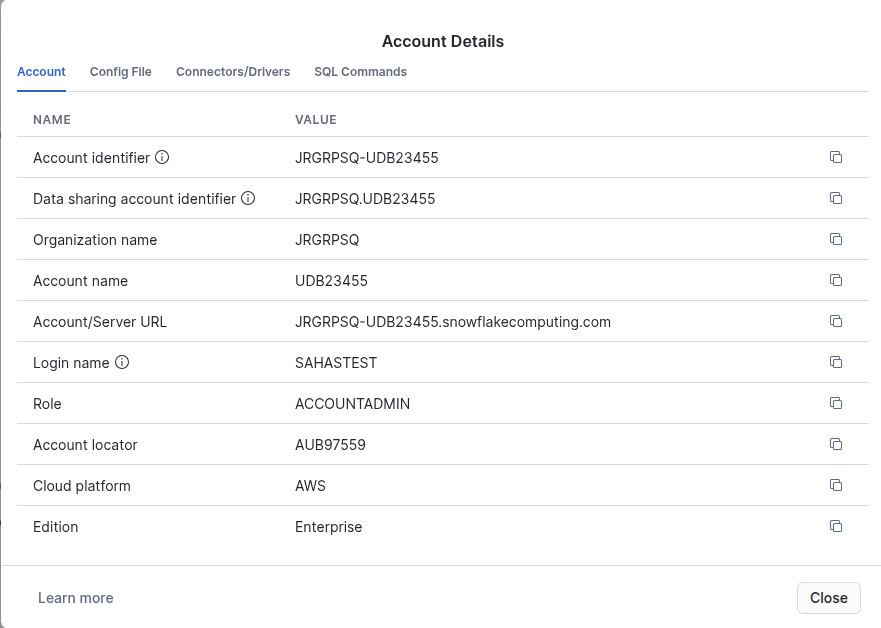
Use the Account identifier value in the Bicycle connection form — not the data sharing identifier (which uses a dot instead of a hyphen).
Allowlist Bicycle network access
If your Snowflake account uses a network policy to restrict access by IP address, work with your Snowflake administrator to allow inbound traffic before you create the connection in Bicycle. Bicycle does not configure network policies or validate network access during connection setup — blocked network access appears as a failed Test connection.
Add the IP addresses to the account- or user-level network policy that controls access to your Snowflake account.
Contact your Bicycle administrator for the IP addresses to allowlist. Bicycle does not display these addresses in the Connectors UI.
Connect with Key pair (recommended)
Use this path for new production connections.
In Snowflake
Generate a key pair
Run these commands on a secure workstation or build agent approved by your organization:
openssl genrsa 2048 | openssl pkcs8 -topk8 -inform PEM -out rsa_key.p8 -nocrypt
openssl rsa -in rsa_key.p8 -pubout -out rsa_key.pub
For an encrypted private key, add -v2 aes-256-cbc instead of -nocrypt when running openssl pkcs8.
Assign the public key to the service user
- Open
rsa_key.puband copy the public key body (without theBEGIN/ENDheader lines). - In a Snowflake worksheet, run:
ALTER USER bicycle_user SET RSA_PUBLIC_KEY='<copied_public_key>';
In Bicycle
Snowflake connection parameters can be case sensitive. Confirm warehouse, database, schema, and table names match your Snowflake environment exactly.
Open Connectors and select Snowflake
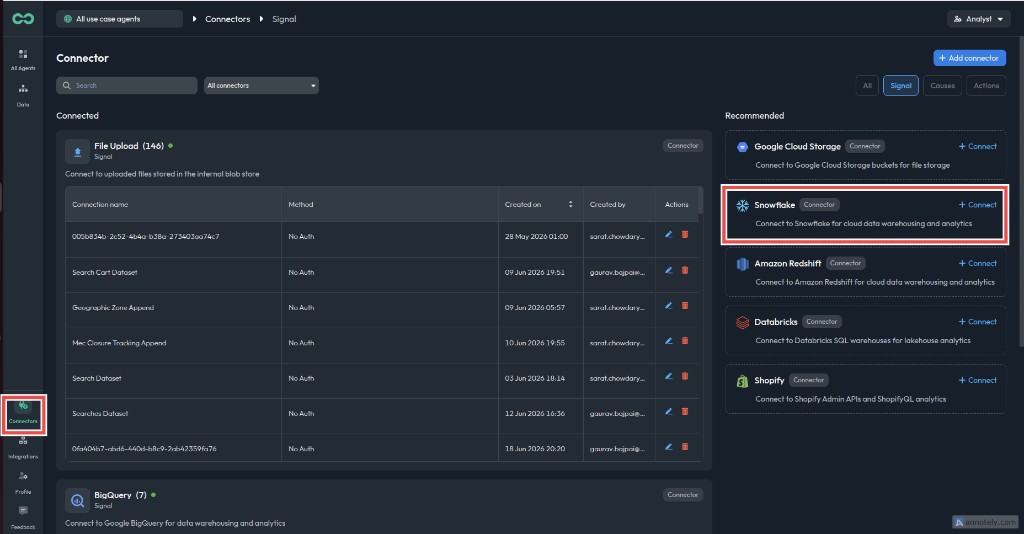
- In Bicycle, go to Connectors.
- Under Recommended, find Snowflake and click + Connect.
Choose Key pair
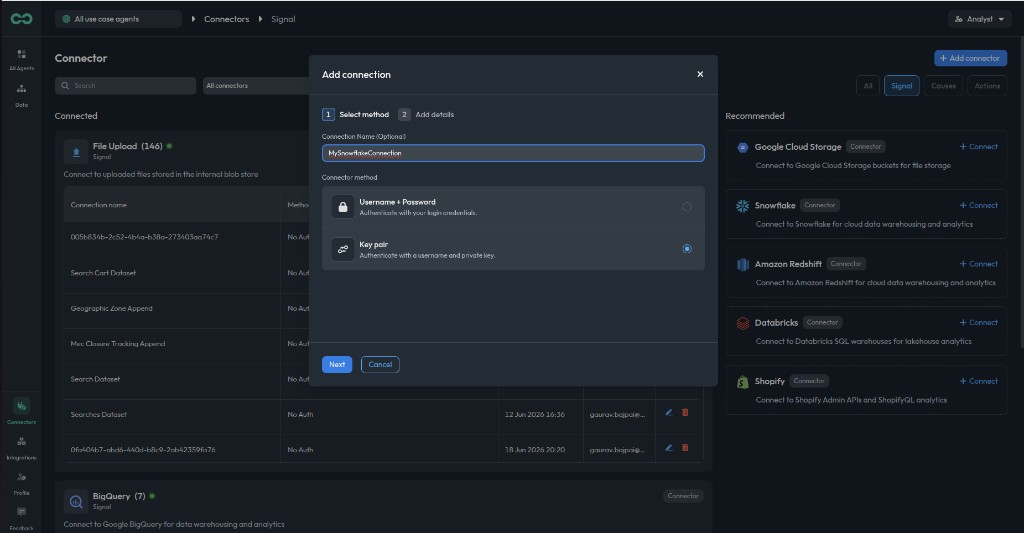
- Enter a connection name that identifies the environment (for example,
Snowflake Production). - Select Key pair as the Connector method, then click Next.
Enter connection details
On the Add details step, fill in the Snowflake connection fields and key-pair credentials.
AccountRequiredYour Snowflake account identifier
WarehouseRequiredThe warehouse Bicycle uses for queries
DatabaseRequiredThe database to connect to
SchemaIf omitted, Bicycle discovers all schemas in the database
Table PatternOptional regex to filter tables during discovery
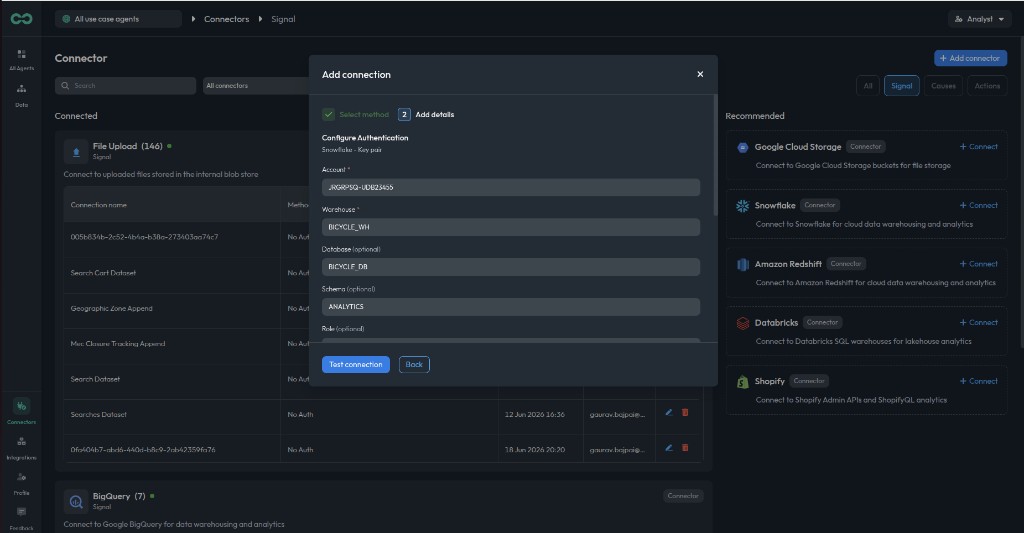
UsernameRequiredThe service user from above (for example, bicycle_user)
Private Key (PEM format)RequiredThe private key from rsa_key.p8
PassphraseRequired only if the private key is encrypted
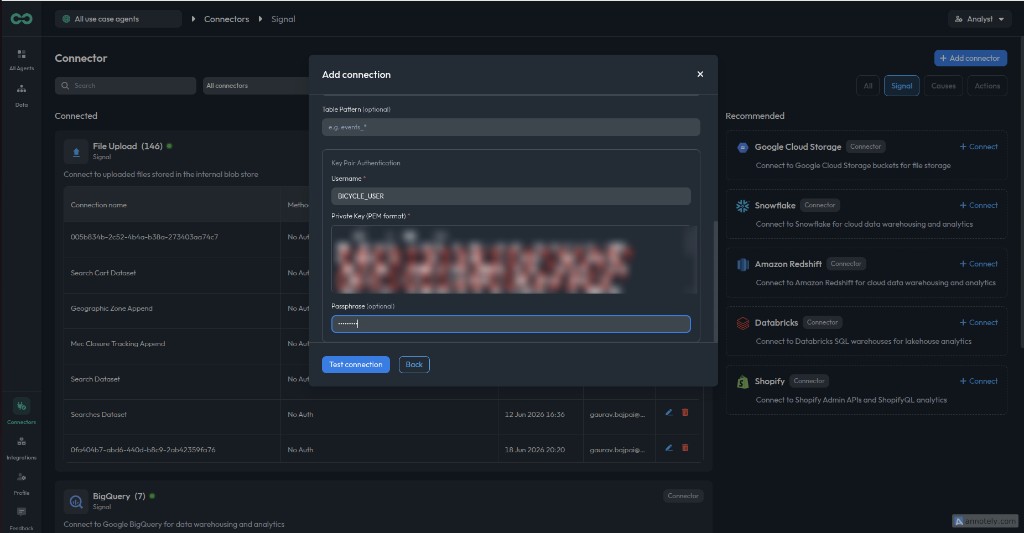
Test the connection
Click Test connection. When the test succeeds, you will see Ready to add this connection:
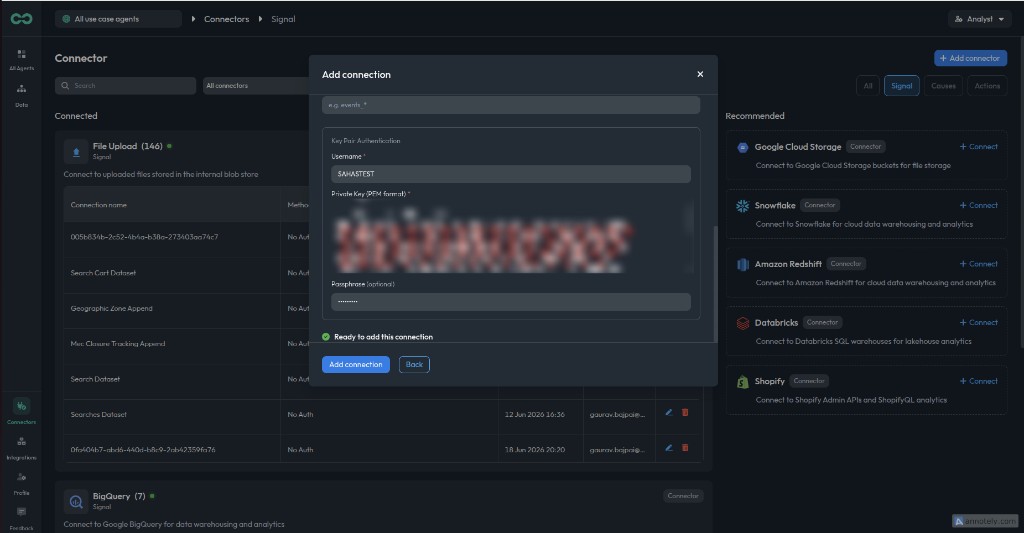
Add the connection
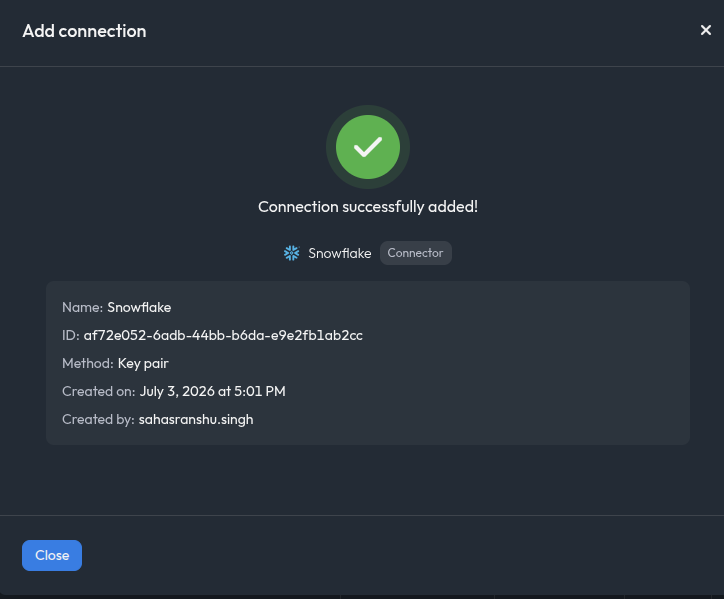
Click Add connection. When the connection is created successfully, you will see a confirmation with the connection name, ID, and method (Key pair). Click Close to return to the Connectors page.
Connect with Username + Password
Use this path only if your organization's Snowflake policy still allows password-based service accounts.
Snowflake is phasing out single-factor password authentication, with full enforcement expected by November 2026. Use key-pair authentication for new production connections.
In Snowflake
Set a password on the service user
Set a password when you create the service user, or run:
ALTER USER bicycle_user SET PASSWORD = '<secure_password>';
In Bicycle
Open Connectors and select Snowflake
- In Bicycle, go to Connectors.
- Under Recommended, find Snowflake and click + Connect.
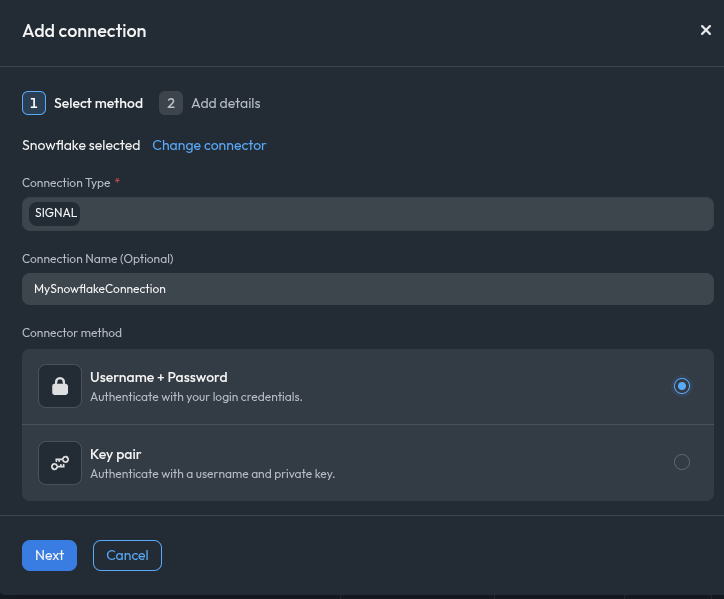
Choose Username + Password
- Enter a connection name that identifies the environment (for example,
Snowflake Production). - Select Username + Password as the Connector method, then click Next.
Enter connection details
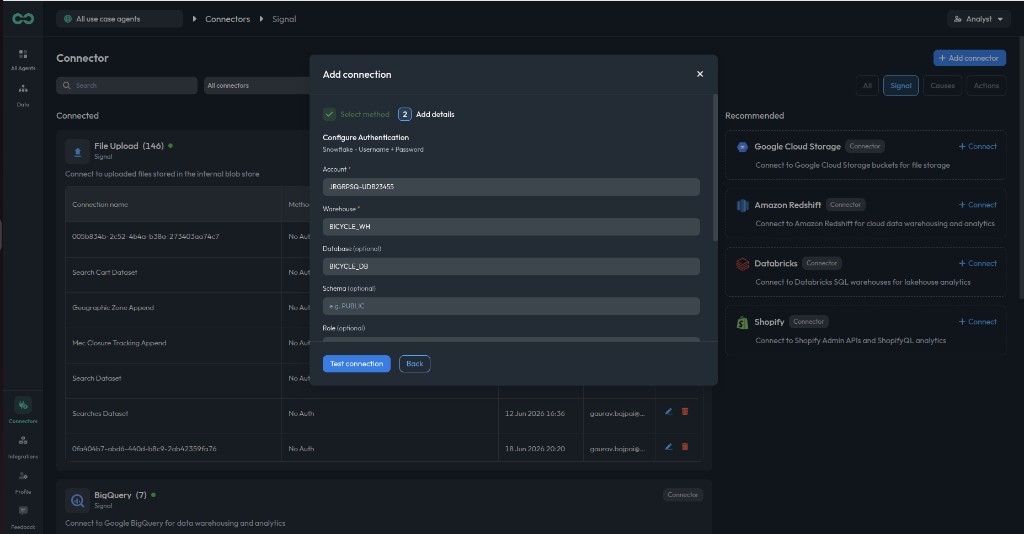
On the Add details step, fill in the Snowflake connection fields and password credentials.
AccountRequiredYour Snowflake account identifier
WarehouseRequiredThe warehouse Bicycle uses for queries
DatabaseRequiredThe database to connect to
SchemaIf omitted, Bicycle discovers all schemas in the database
Table PatternOptional regex to filter tables during discovery
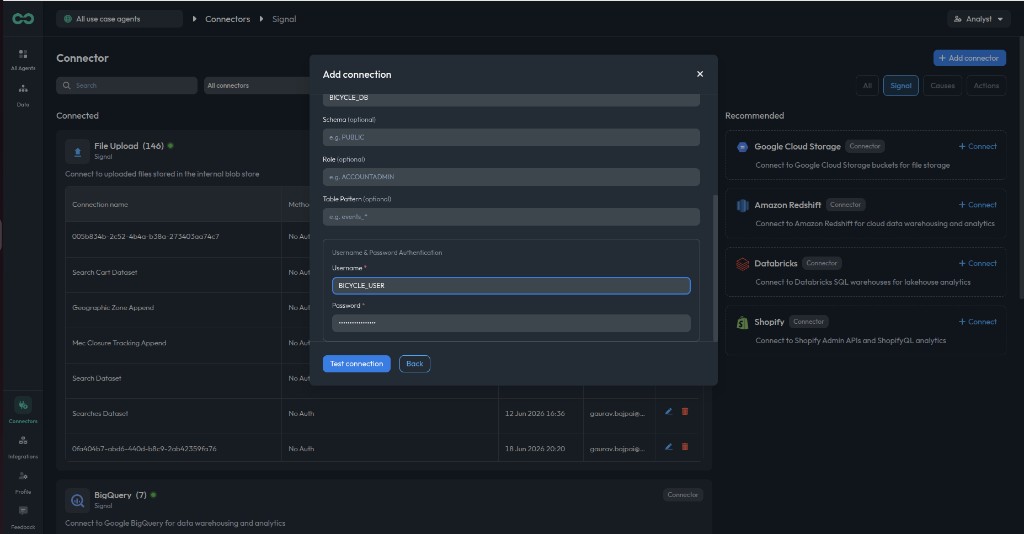
UsernameRequiredThe service user from above (for example, bicycle_user)
PasswordRequiredThe password set in Snowflake
Test the connection
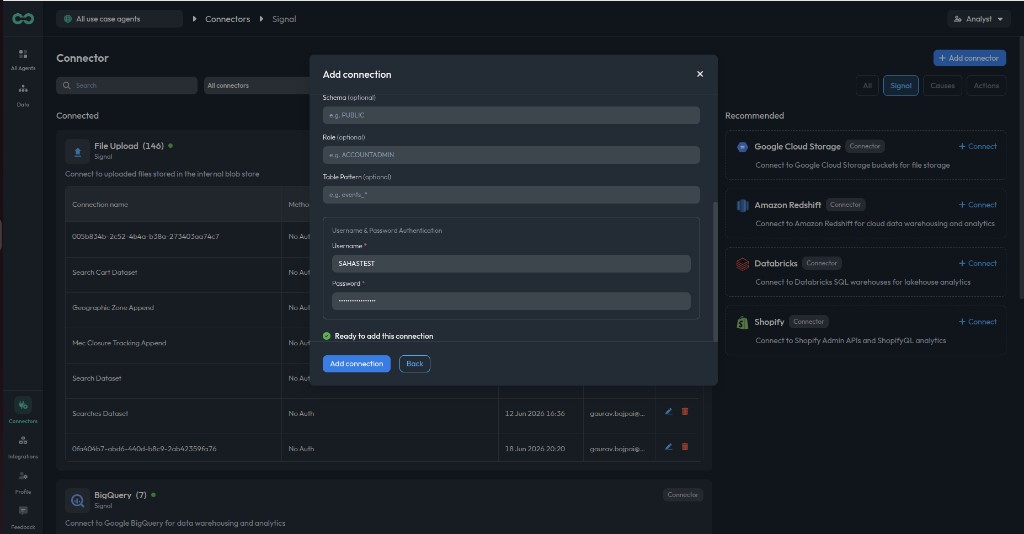
Click Test connection. When the test succeeds, you will see Ready to add this connection:
Add the connection
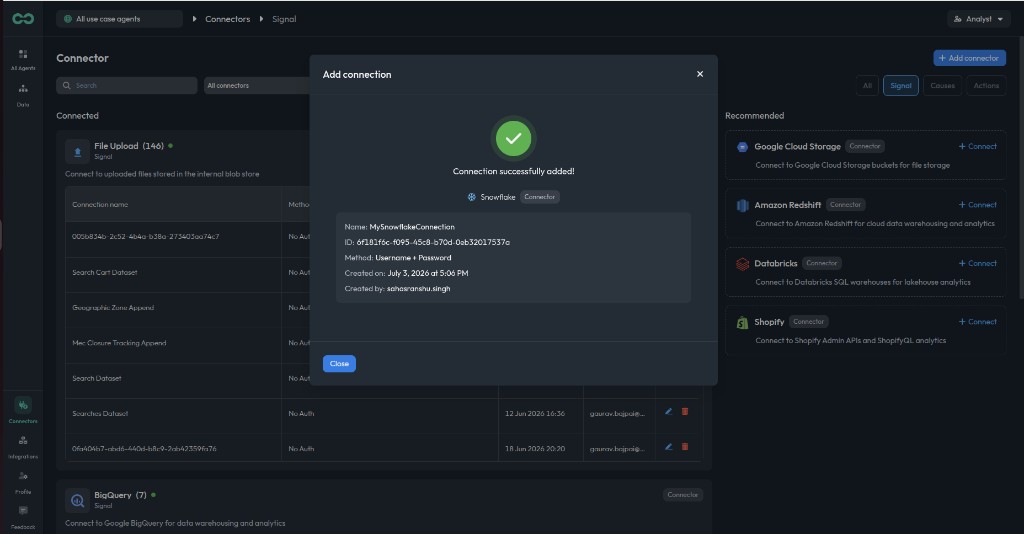
Click Add connection. When the connection is created successfully, you will see a confirmation with the connection name, ID, and method (Username + Password). Click Close to return to the Connectors page.
Troubleshooting
If Test connection fails or no tables appear after connecting, check the following.
Key pair authentication
| Error or symptom | Likely cause | Fix |
|---|---|---|
Failed to parse private key: ... password empty | The private key is encrypted (-----BEGIN ENCRYPTED PRIVATE KEY-----) but Passphrase is empty in Bicycle | Enter the passphrase used when generating the key, or regenerate an unencrypted key with -nocrypt and update the public key in Snowflake |
JWT token is invalid | The public key is not assigned to the user, or Username in Bicycle does not match the Snowflake user that has the key | Run ALTER USER <service_user> SET RSA_PUBLIC_KEY='...' in Snowflake and confirm the Username field matches that user exactly |
| Connection succeeds but no tables are discovered | Missing SELECT grants, wrong database or schema, or Table Pattern filters out all tables | Verify grant SQL ran successfully; confirm Database, Schema, and Table Pattern match your Snowflake objects |
Username + Password authentication
| Error or symptom | Likely cause | Fix |
|---|---|---|
Incorrect username or password | Wrong credentials, or password not set on the service user | Confirm Username matches the Snowflake service user and run ALTER USER <service_user> SET PASSWORD = '...' if needed |
| Connection succeeds but no tables are discovered | Same as key pair — grants or scope misconfiguration | Verify warehouse, database, and schema grants; check Table Pattern if set |
Account and connection settings
| Error or symptom | Likely cause | Fix |
|---|---|---|
| Cannot connect / invalid account | Account uses the wrong identifier format | Copy Account identifier from Snowflake account details (hyphen format, e.g. ORGNAME-ACCOUNTNAME). Do not use the data sharing identifier (dot format) or the legacy account locator |
| Cannot connect / connection timeout | A Snowflake network policy blocks Bicycle | Ask your Snowflake administrator to add the IP addresses to the account or user network policy |
| Object not found or authorization errors | Warehouse, database, schema, or role names do not match Snowflake | Snowflake object names can be case sensitive. Enter names exactly as they appear in Snowflake, including uppercase warehouse and database names if your account uses them |
If issues persist, ask your Snowflake administrator to confirm the service user can run SELECT on the target tables when connected with the same warehouse, database, and role configured in Bicycle.