Connecting Stripe to Bicycle
Connect Stripe so Bicycle agents can read and act on your payments data — charges, payment intents, customers, subscriptions, invoices, disputes, refunds, payouts, and balance transactions — through the Stripe MCP server.
Bicycle supports two authentication methods:
| Method | When to use |
|---|---|
| OAuth | Interactive setup for your own Stripe account. Nothing to copy or paste, and you choose the exact permissions on Stripe's consent screen. Requires an admin to allow MCP access through OAuth. Cannot access Connect connected accounts. |
| API key | Long-lived or headless access, and the only option for querying a Connect connected account. You choose how broad the key is. |
This connector can reach live financial data, and the ACTION capability can create refunds and modify subscriptions, invoices, and prices. Grant only what the work requires. You have a precise lever in both methods — the permission picker on Stripe's OAuth consent screen, or the resource permissions on a restricted API key. Stripe also recommends requiring human confirmation of tool calls to reduce prompt-injection risk.
Requirements
To follow the steps in this guide, you'll need:
- Permission to create connectors in Bicycle
- A Stripe account (sandbox or live)
- For OAuth: Allow MCP access through OAuth enabled by a Stripe admin, and pop-ups allowed in your browser
- For API key: permission to create API keys in the Stripe Dashboard, plus two-factor verification to complete key creation
- For connected accounts: the connected account's ID (
acct_…) and an API key on the platform account
- Stripe MCP server — hosted endpoint, auth methods, tools, connected accounts
- Restricted API keys — creating scoped keys and permission levels
- API keys — key types, prefixes, and safe storage
- Stripe MCP server source (
@stripe/mcp)
How the connection works
Both methods talk to the same hosted Stripe MCP server at https://mcp.stripe.com, so the tools available are the same. Only the transport and the credential differ.
| OAuth | API key | |
|---|---|---|
| Stripe MCP endpoint | https://mcp.stripe.com | https://mcp.stripe.com |
| How Bicycle connects | Directly over HTTP with the OAuth access token | Runs Stripe's @stripe/mcp package, which proxies to the same hosted endpoint with your key as a bearer token |
| Authorization URL | https://access.stripe.com/mcp/oauth2/authorize | — |
| Token URL | https://access.stripe.com/mcp/oauth2/token | — |
| Flow | OAuth 2.0 authorization code with PKCE (S256), public client (no client secret) | Static credential |
| Where permissions are set | Stripe's consent screen, at authorization time | The API key's own permissions |
| Connected accounts | Not supported by Stripe over OAuth | Supported via the connected account ID |
| App registration | None required | None required |
Before you connect: allow MCP access through OAuth
This step applies to the OAuth method only. A Stripe admin must turn on MCP access before anyone can authorize an MCP client such as Bicycle. If you plan to use an API key instead, skip to Option 2.
Enable the MCP access toggle
- In the Stripe Dashboard, go to Settings → Team and security.
- Open the MCP access tab (alongside Team, Security history, and Access requests).
- Turn on Allow MCP access through OAuth.
Stripe describes the toggle as: Team members can connect to Stripe's MCP server. Access is limited to the member's role.
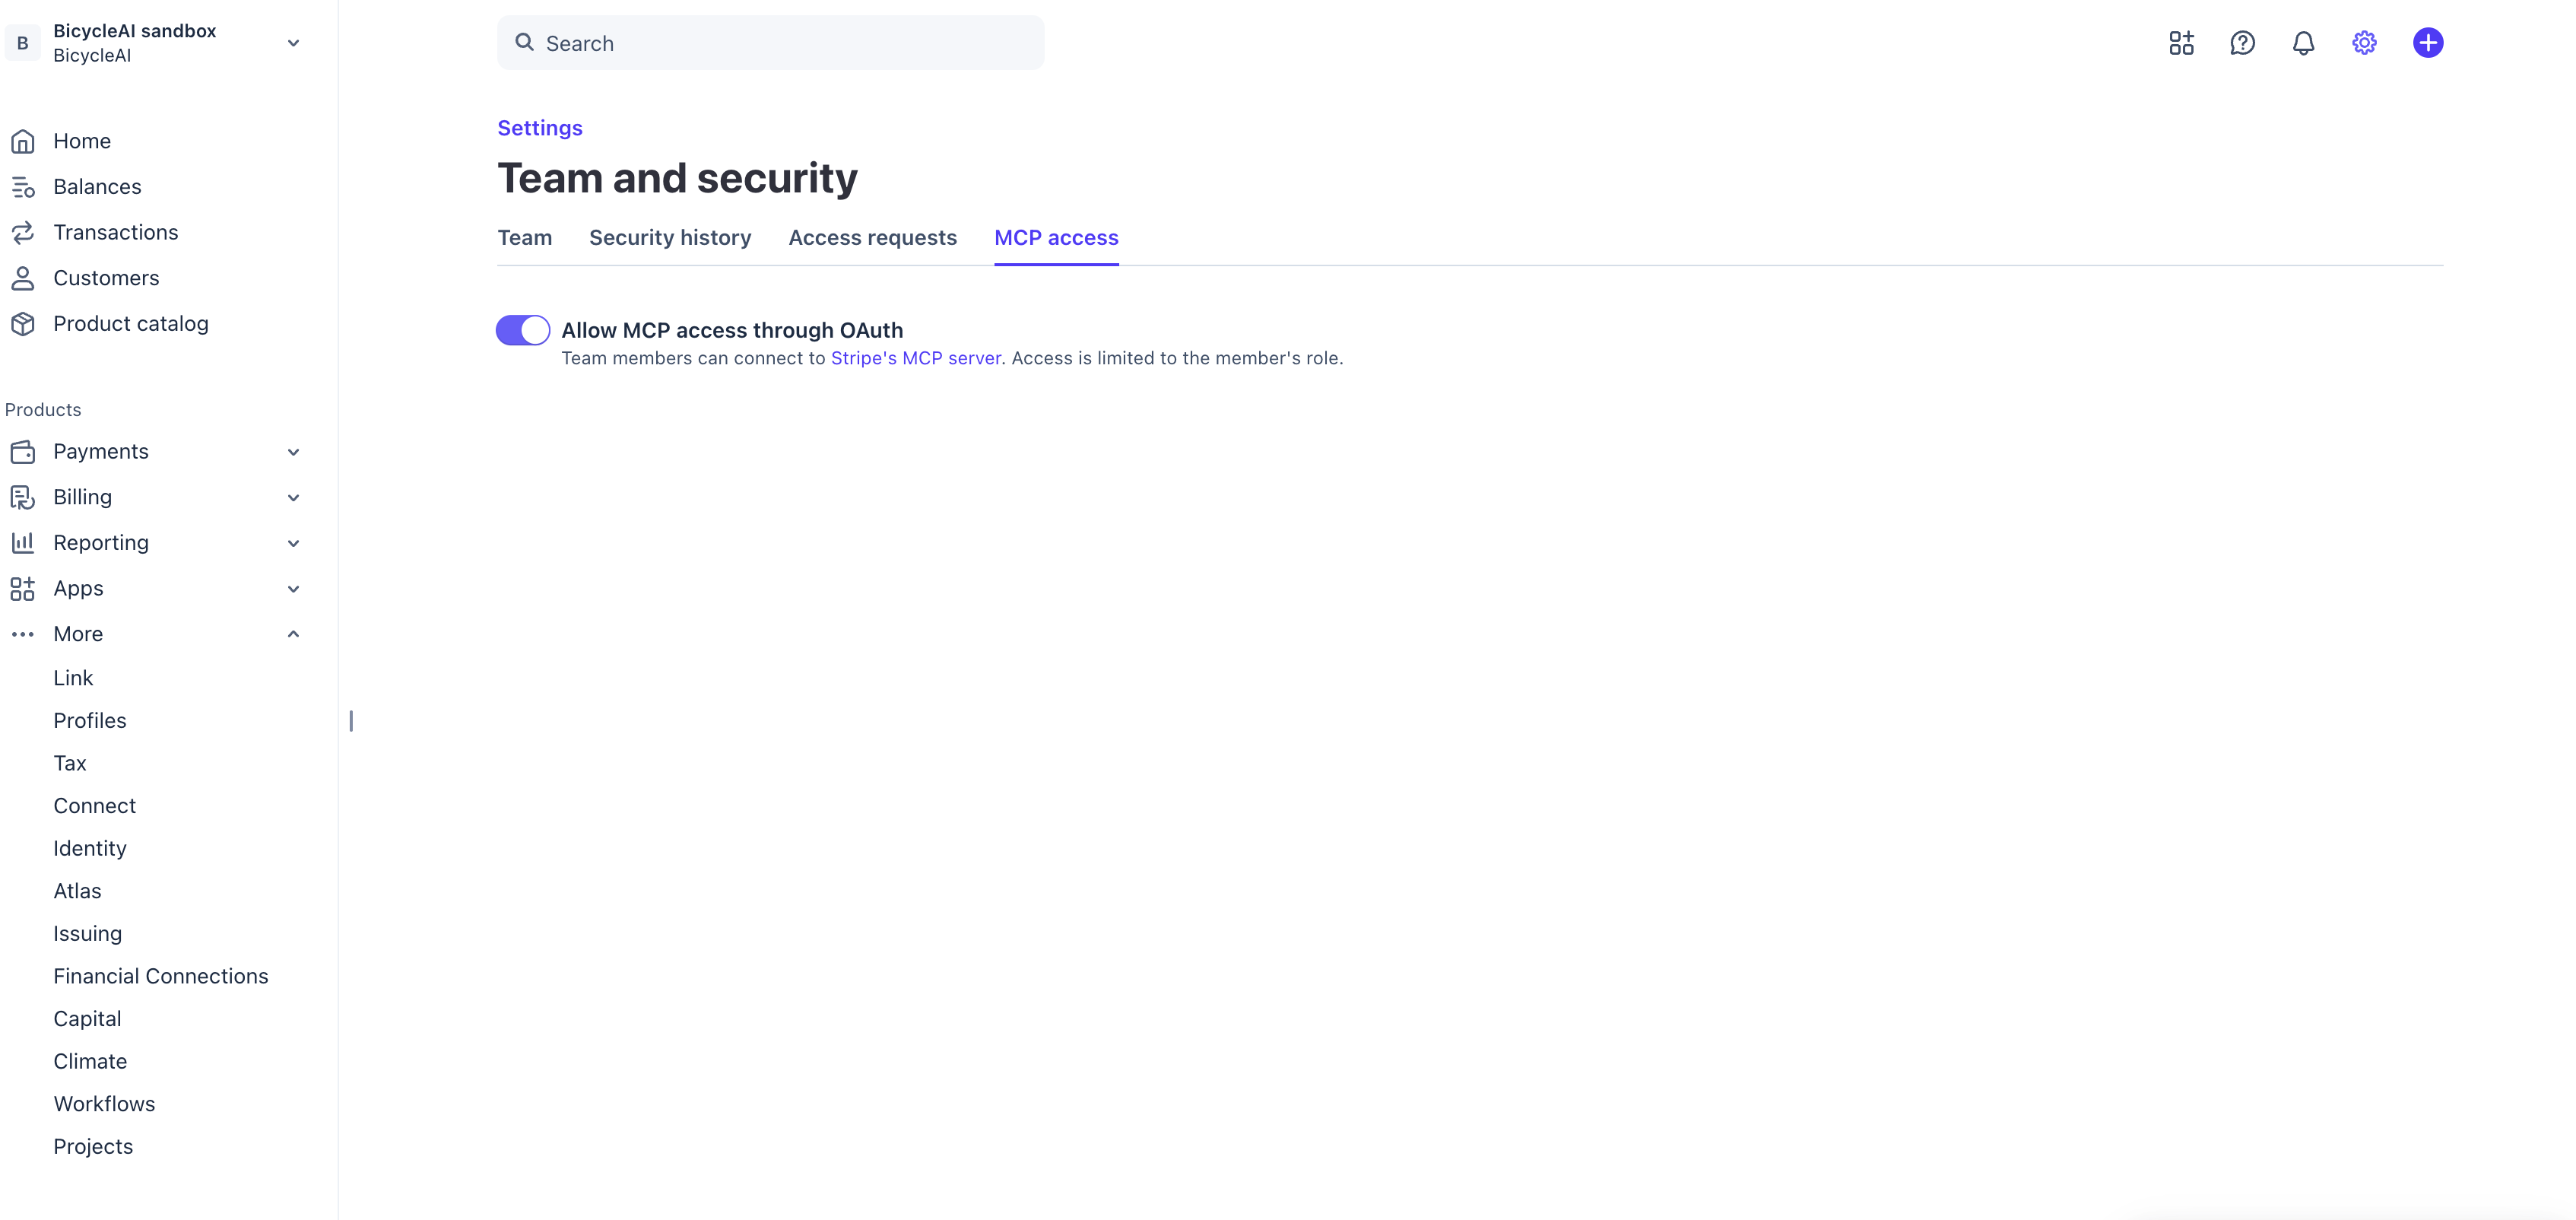
Access is capped by the member's role. Whatever you pick on the consent screen, Stripe will not grant Bicycle more than the authorizing user's own role allows. Authorizing with a limited Stripe user is a second way to constrain access.
Sandbox and live are configured separately. Stripe manages MCP access and authentication independently per environment, so enabling this in a sandbox does not enable it in live mode. Check the account switcher at the top-left of the Dashboard to confirm which one you're editing.
Option 1: OAuth
Open Connectors and select Stripe
In Bicycle, go to Connectors. Find Stripe and click + Connect.
Choose OAuth as the connector method
Step 1 of the wizard is Select method. Bicycle shows the note This connector uses MCP (Model Context Protocol) for agent tools.
Under Connector method, select OAuth (Securely link your Bicycle account using OAuth), then click Next. Neither method is preselected, so Next stays disabled until you choose one.
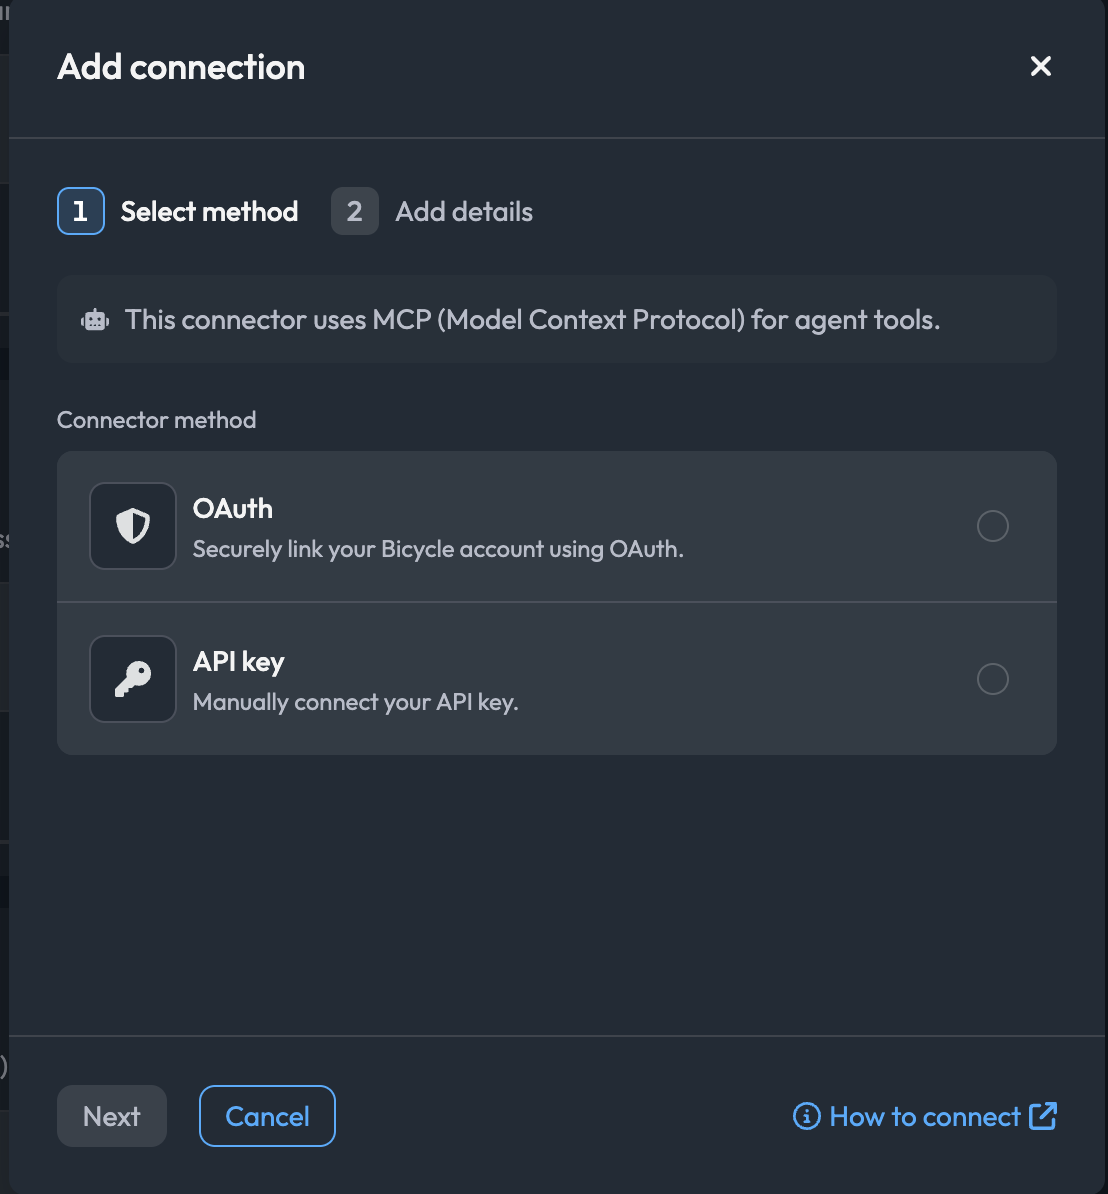
The How to connect link in the wizard footer opens this guide at any point.
Name the connection
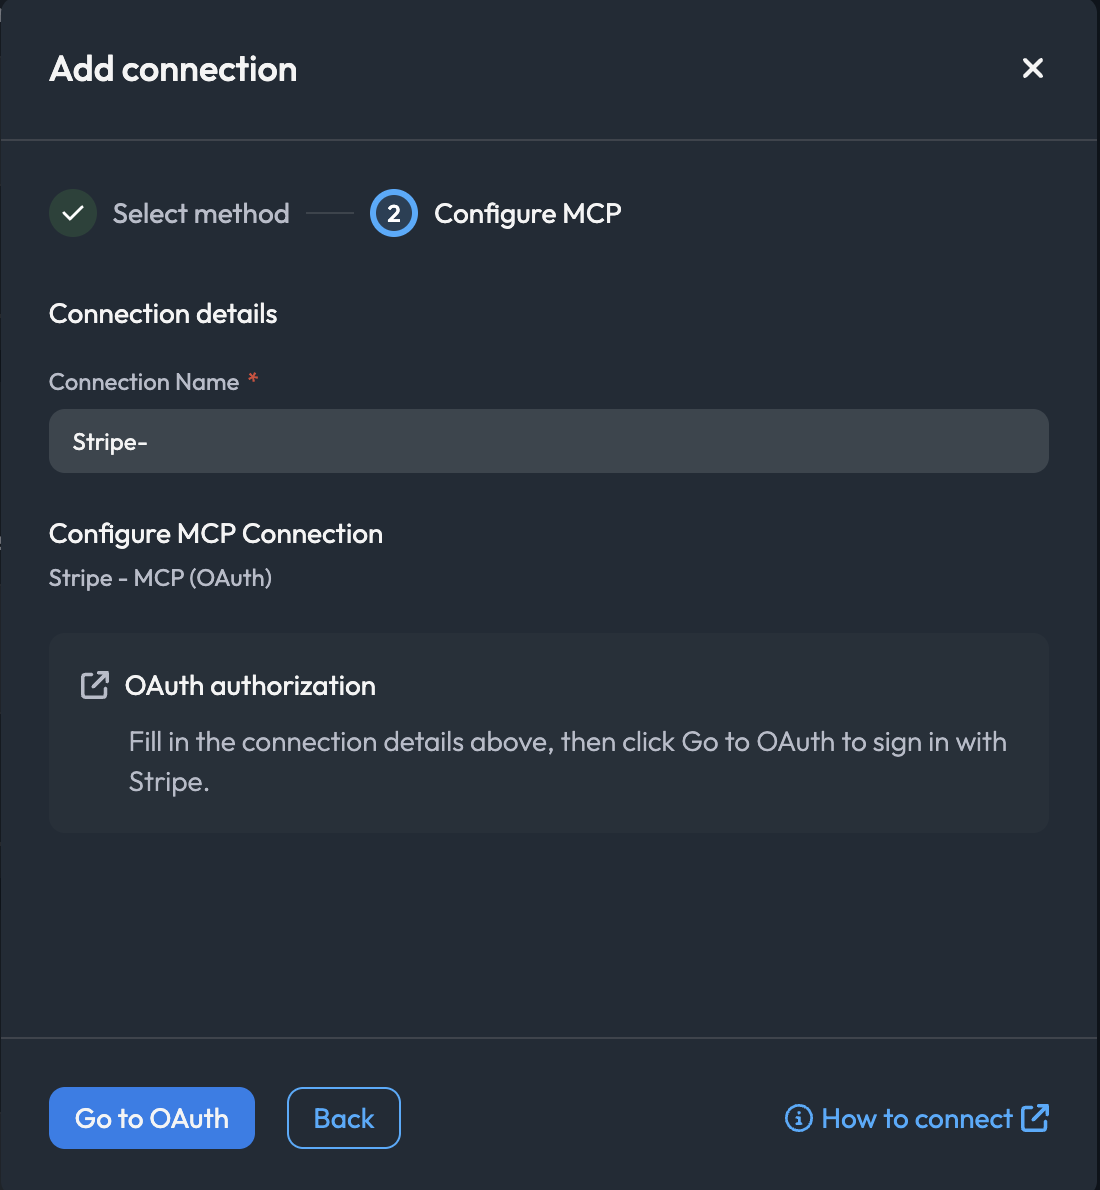
Step 2 is Configure MCP. The section header reads Configure MCP Connection with the subtitle Stripe - MCP (OAuth).
Connection NameRequiredA name that tells this connection apart from other Stripe connections at a glance — it appears in Bicycle's connector list and whenever someone picks a connection for an agent. Because Stripe keeps sandbox and live access separate, name the environment explicitly: for example Stripe Live — acme or Stripe Sandbox — acme.
Go to OAuth stays disabled until the connection name is filled.
Choose permissions and authorize in Stripe
Click Go to OAuth. Bicycle opens a popup to Stripe and the main window shows Waiting for authorization...
Stripe's page reads Bicycle AI would like access to your Stripe account. Unlike a simple approve/deny prompt, this screen is where you decide what Bicycle can do:
- Confirm the account and environment. The account card names the Stripe account and environment (for example, a sandbox). Use Switch account if it isn't the one you want.
- Set the permissions. Under Permissions requested, each resource group has None, Read, and Write buttons, with an All permissions row to set every group at once. Expand a group with the › arrow to set individual resources inside it. Some groups offer only the levels Stripe supports for them.
- Review the redirect. Stripe shows which domain you'll be sent back to — it should be your Bicycle app domain.
- Click Authorize.
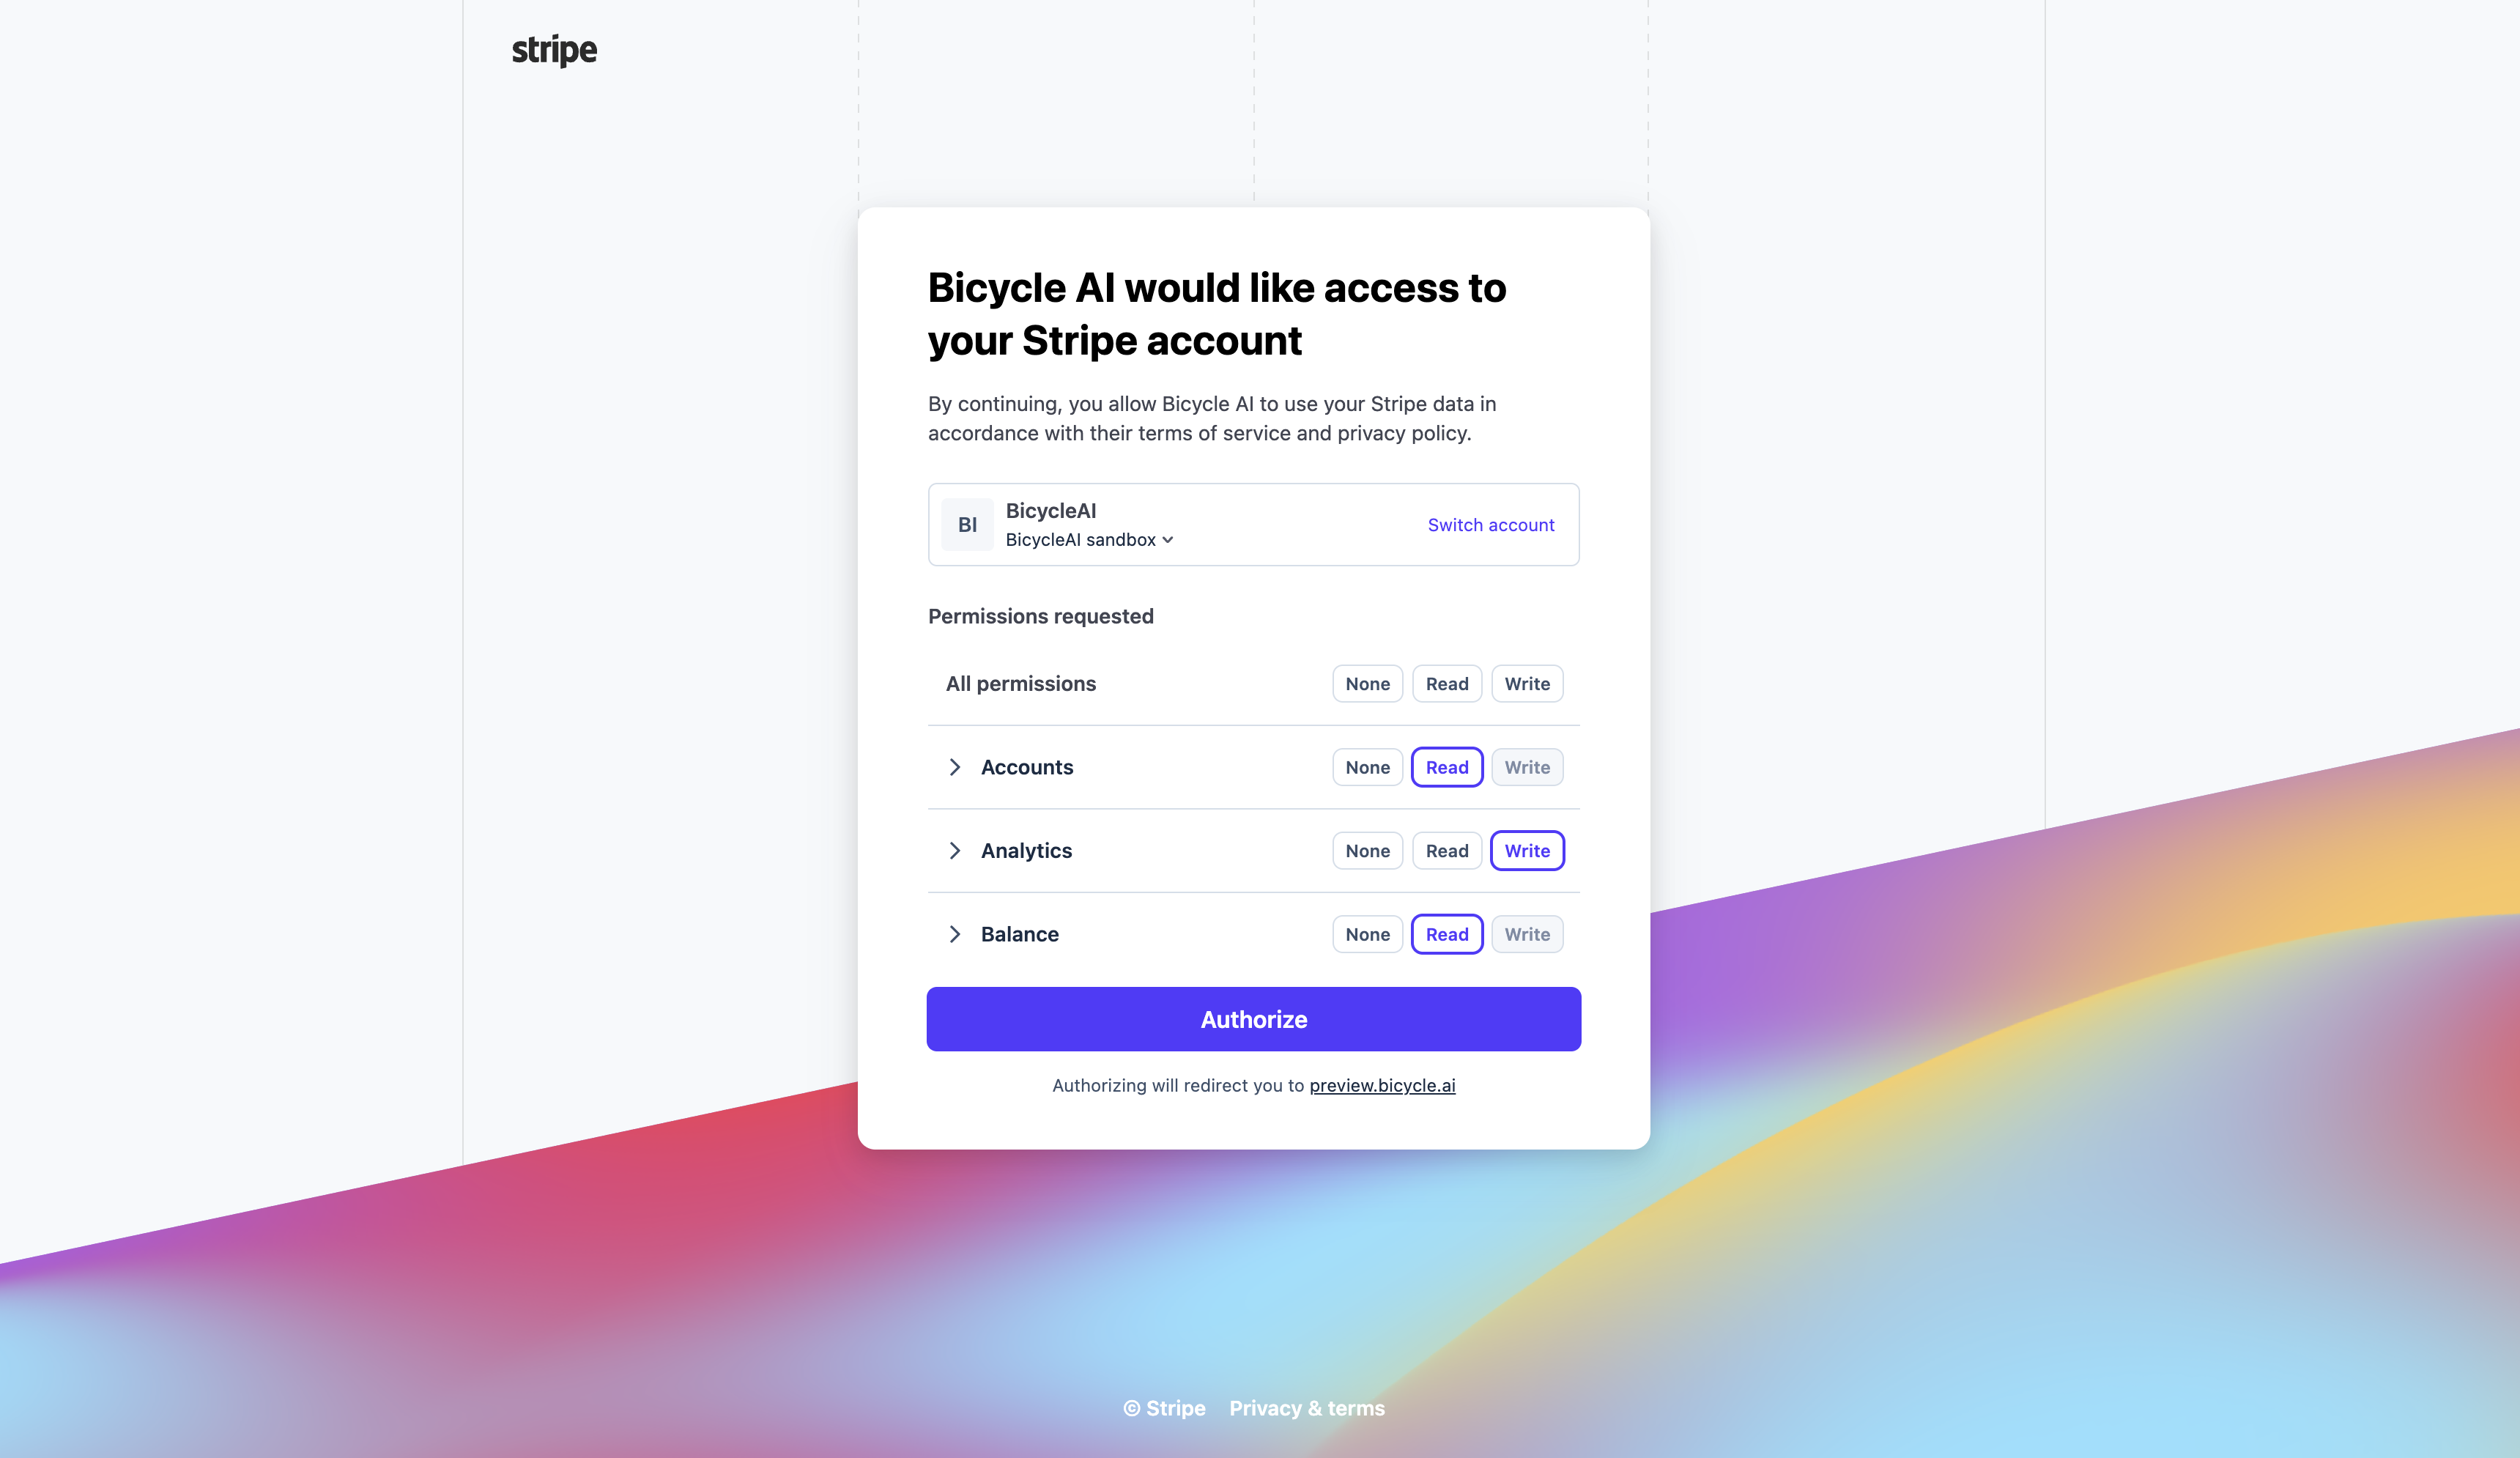
For investigation-only use, set the groups you need to Read and leave everything else None. Only grant Write where you intend Bicycle to change Stripe data through the ACTION capability. Bicycle requests the mcp scope, but what that scope actually permits is decided here and capped by your Stripe role.
Leave the Bicycle window open — it updates automatically. If you close the popup by accident, click Cancel Authorization and start again.
Review the verification result and save
Bicycle exchanges the code for tokens, connects to the Stripe MCP server, and shows Connection verified successfully with Discovered Tools and each tool's description.
The example below discovered 9 tools, starting with stripe_api_search and stripe_api_details — Stripe's MCP server exposes a small set of general-purpose tools that search and call the Stripe API, rather than one tool per resource. The count changes as Stripe revises the server, and the permissions you granted affect what those tools can actually reach.
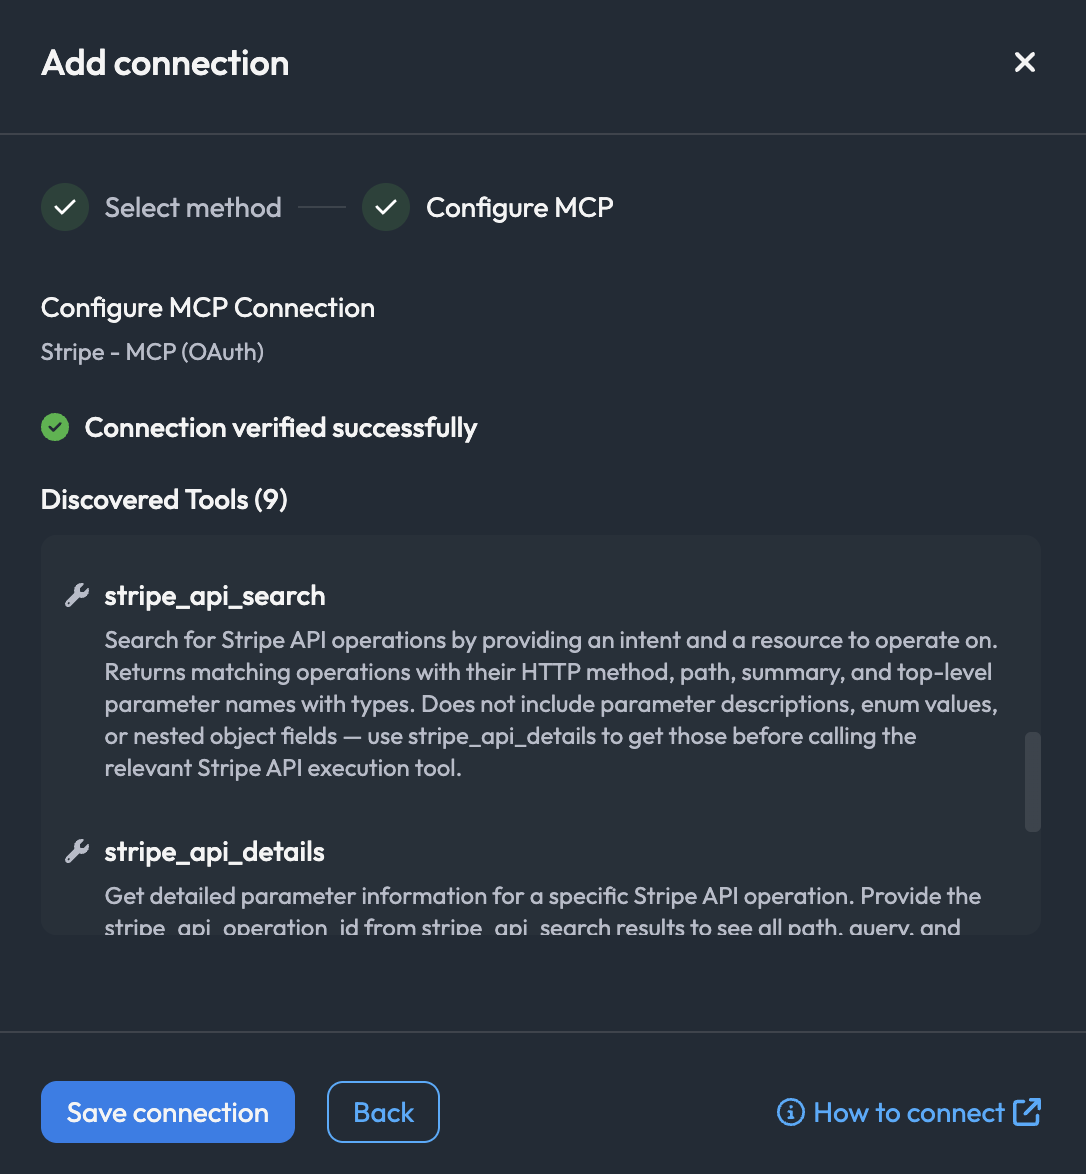
Click Save connection. Bicycle shows Connection successfully added! with the connection name, ID, and method (OAuth). Click Close.
Managing and revoking OAuth sessions
Stripe records each MCP OAuth session and lets you revoke it without touching Bicycle:
- Your own sessions: Stripe Dashboard → User settings → OAuth sessions.
- Other users' sessions: an admin can view and revoke them from Settings → Team and security. This requires a role with permission to manage team members and OAuth sessions, such as Administrator.
Revocation is scoped to the current account and environment — revoking a session for one account does not affect other accounts in the same session. Revoking the session Bicycle uses will break the connection; reconnect via OAuth to restore it.
Option 2: API key
Use an API key for long-lived headless access, or when you need to query a Connect connected account — which Stripe does not support over OAuth.
Choose the kind of key
Go to the Stripe Dashboard → Developers → API keys. Confirm you're in the environment you want first — sandbox and live keys are separate and their prefixes differ.
Stripe splits this page into two sections, and its own descriptions capture the trade-off exactly:
- Restricted keys — "Create a key with specific access limits and permissions for greater security."
- Standard keys — "Create a key with full API access, enabling extensive interaction with your account."
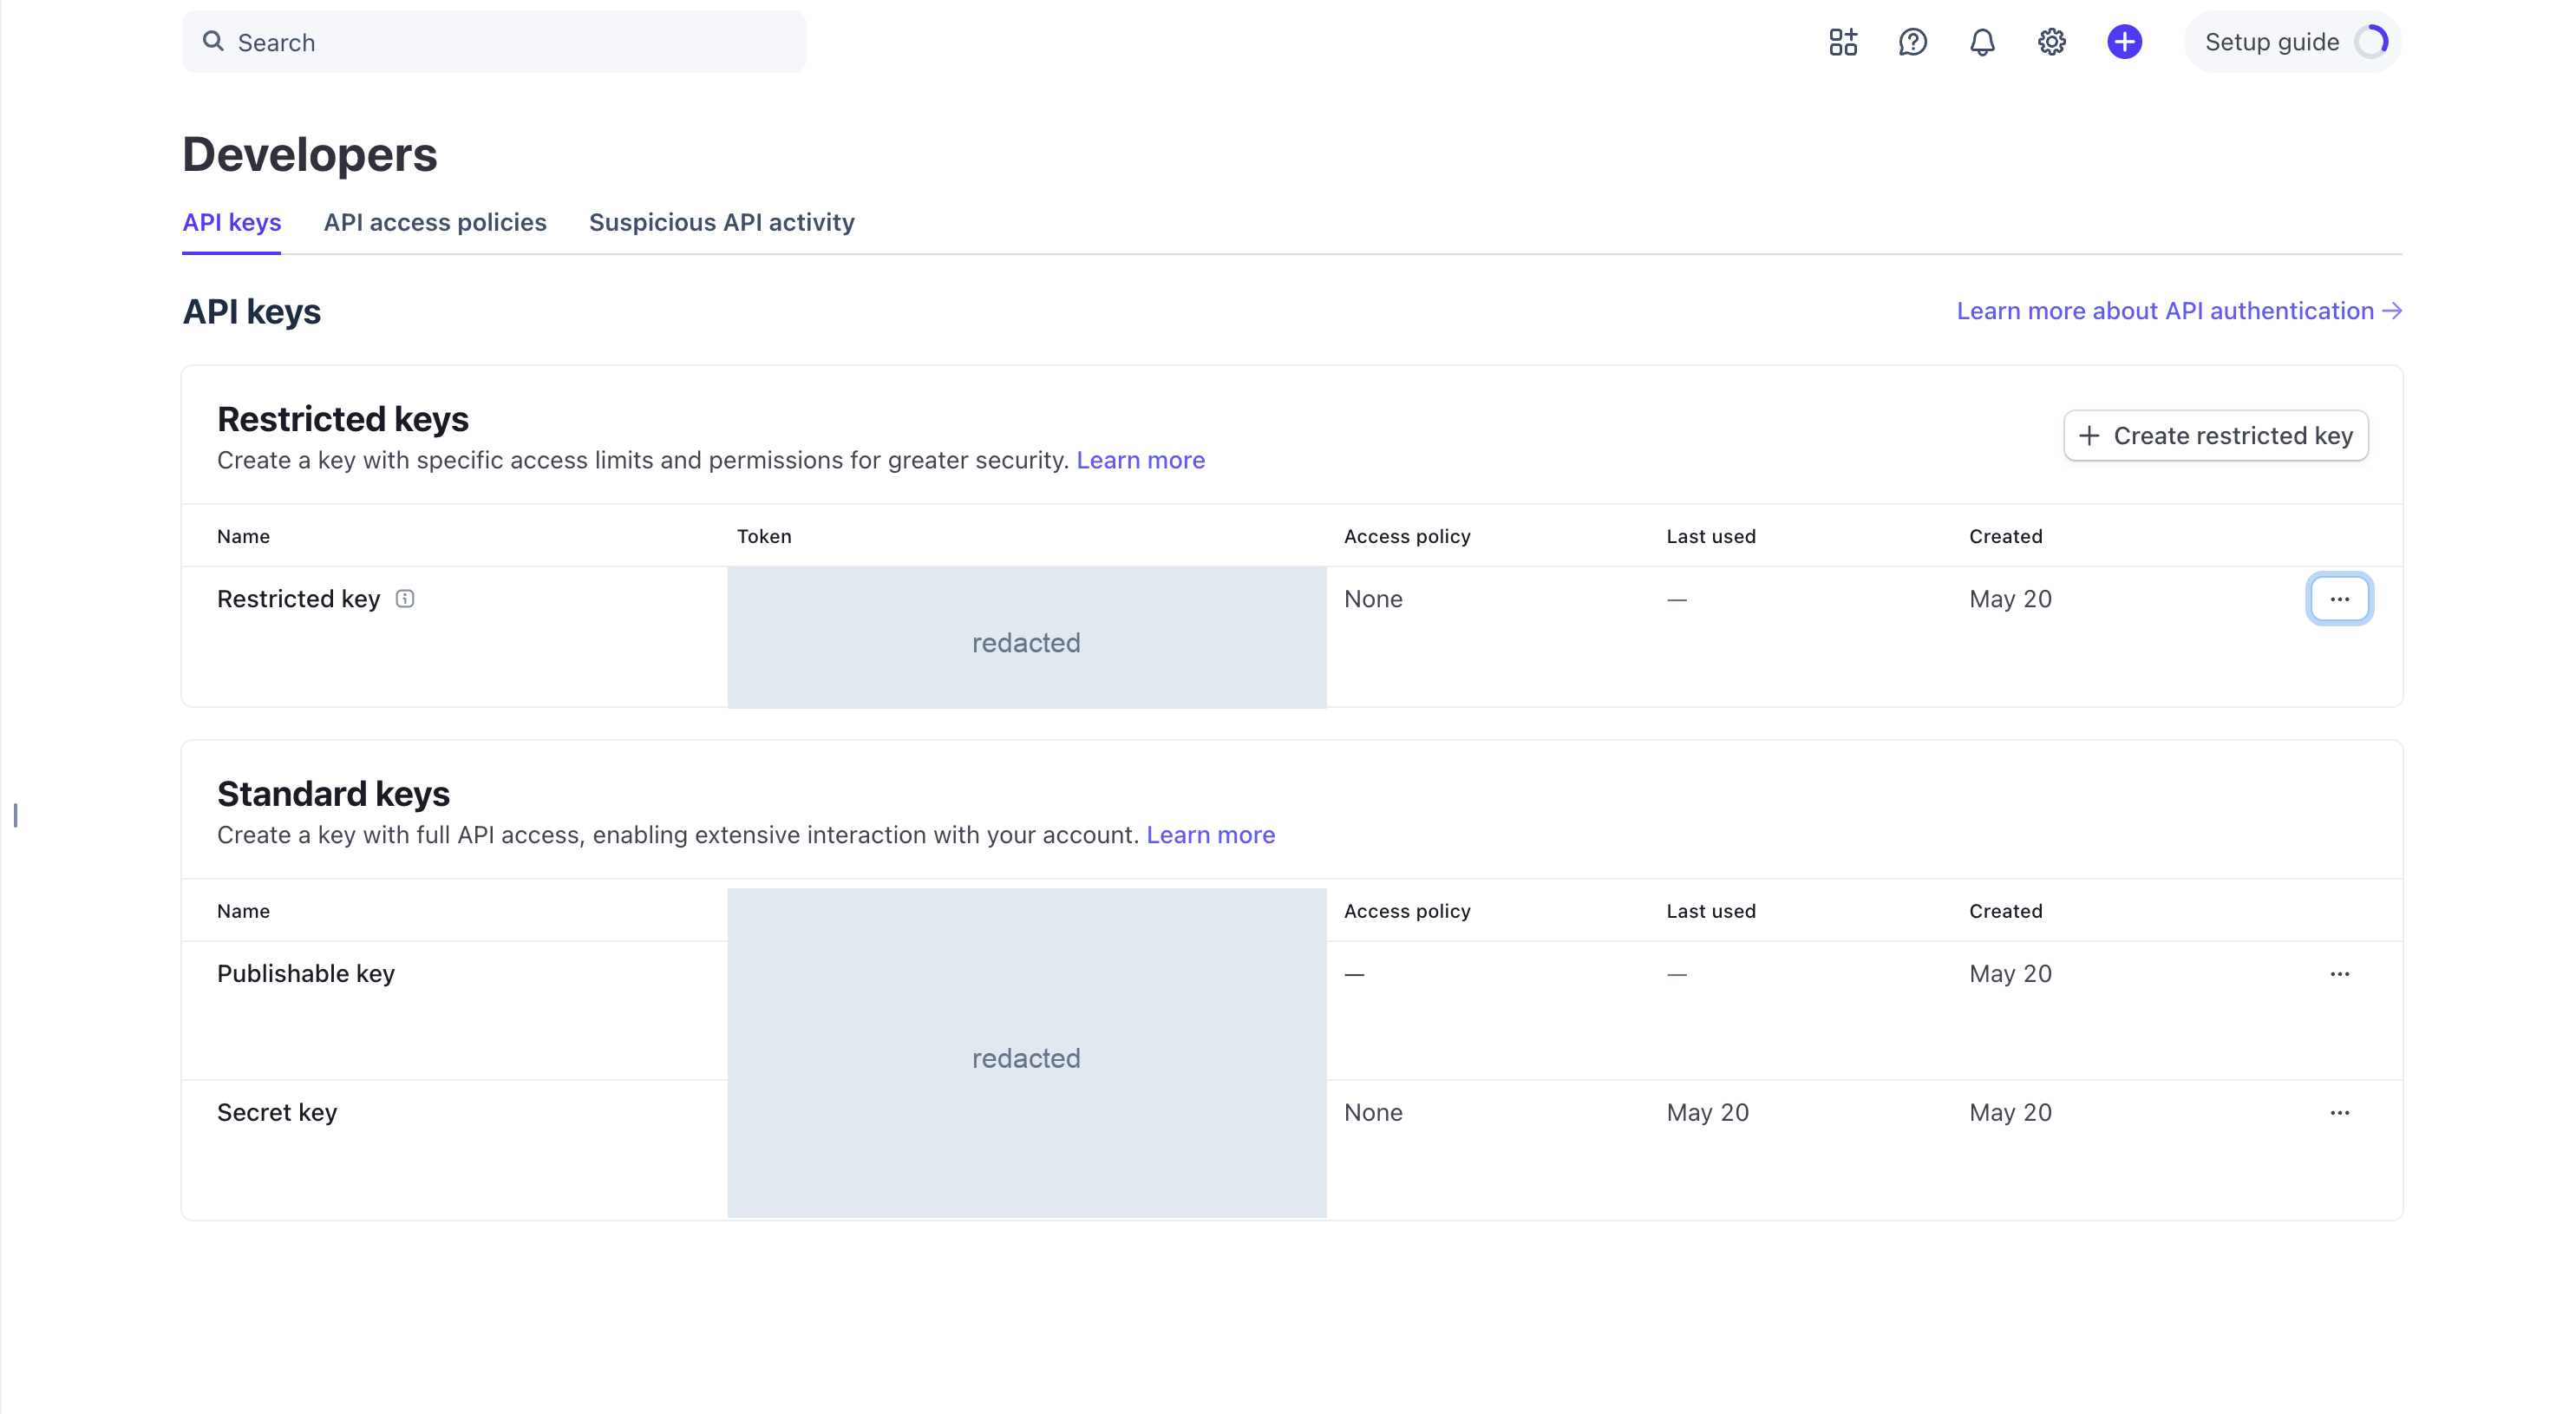
Bicycle's Secret Key field accepts either a standard secret key or a restricted key. Both are valid; they differ only in how much of your account they expose.
| Key type | Prefix | Where to find it | Access | Best for |
|---|---|---|---|---|
| Secret key | sk_test_… / sk_live_… | Standard keys section | Full API access to the account — every resource, read and write | Getting started quickly, and sandbox validation where the data isn't real |
| Restricted key | rk_test_… / rk_live_… | Restricted keys section, via + Create restricted key | Only the resources and levels you select when creating it | Live accounts, and any deployment where Bicycle should be limited to specific resources |
The Standard keys section lists the Publishable key (pk_…) directly above the Secret key. A publishable key will not work — Stripe's MCP server validates the prefix and refuses to start unless the value begins with sk_ or rk_. Copy the row labelled Secret key.
Both key types must be treated as secrets. Stripe's own MCP server accepts an sk_ key but prints a warning recommending a restricted key instead, so expect that nudge if you use one.
Validate the connection with a sandbox secret key (sk_test_…) so permissions can't be what's blocking you while you confirm the setup works. Then create a restricted live key with just the resources you need, and use that for the live connection.
Create a restricted API key
Skip this if you're using a secret key — copy it from the Standard keys section above and go straight to Setup in Bicycle.
Start a new restricted key
In the Restricted keys section, click + Create restricted key.
Grant permissions
Enter a descriptive Key name, such as bicycle-connector, then set permissions.
Stripe lists resources in groups — Core, Access Management, Analytics, Batches, Billing, and more. Each group header has its own None / Read / Write control that sets everything in the group, and each resource beneath it can be set individually.
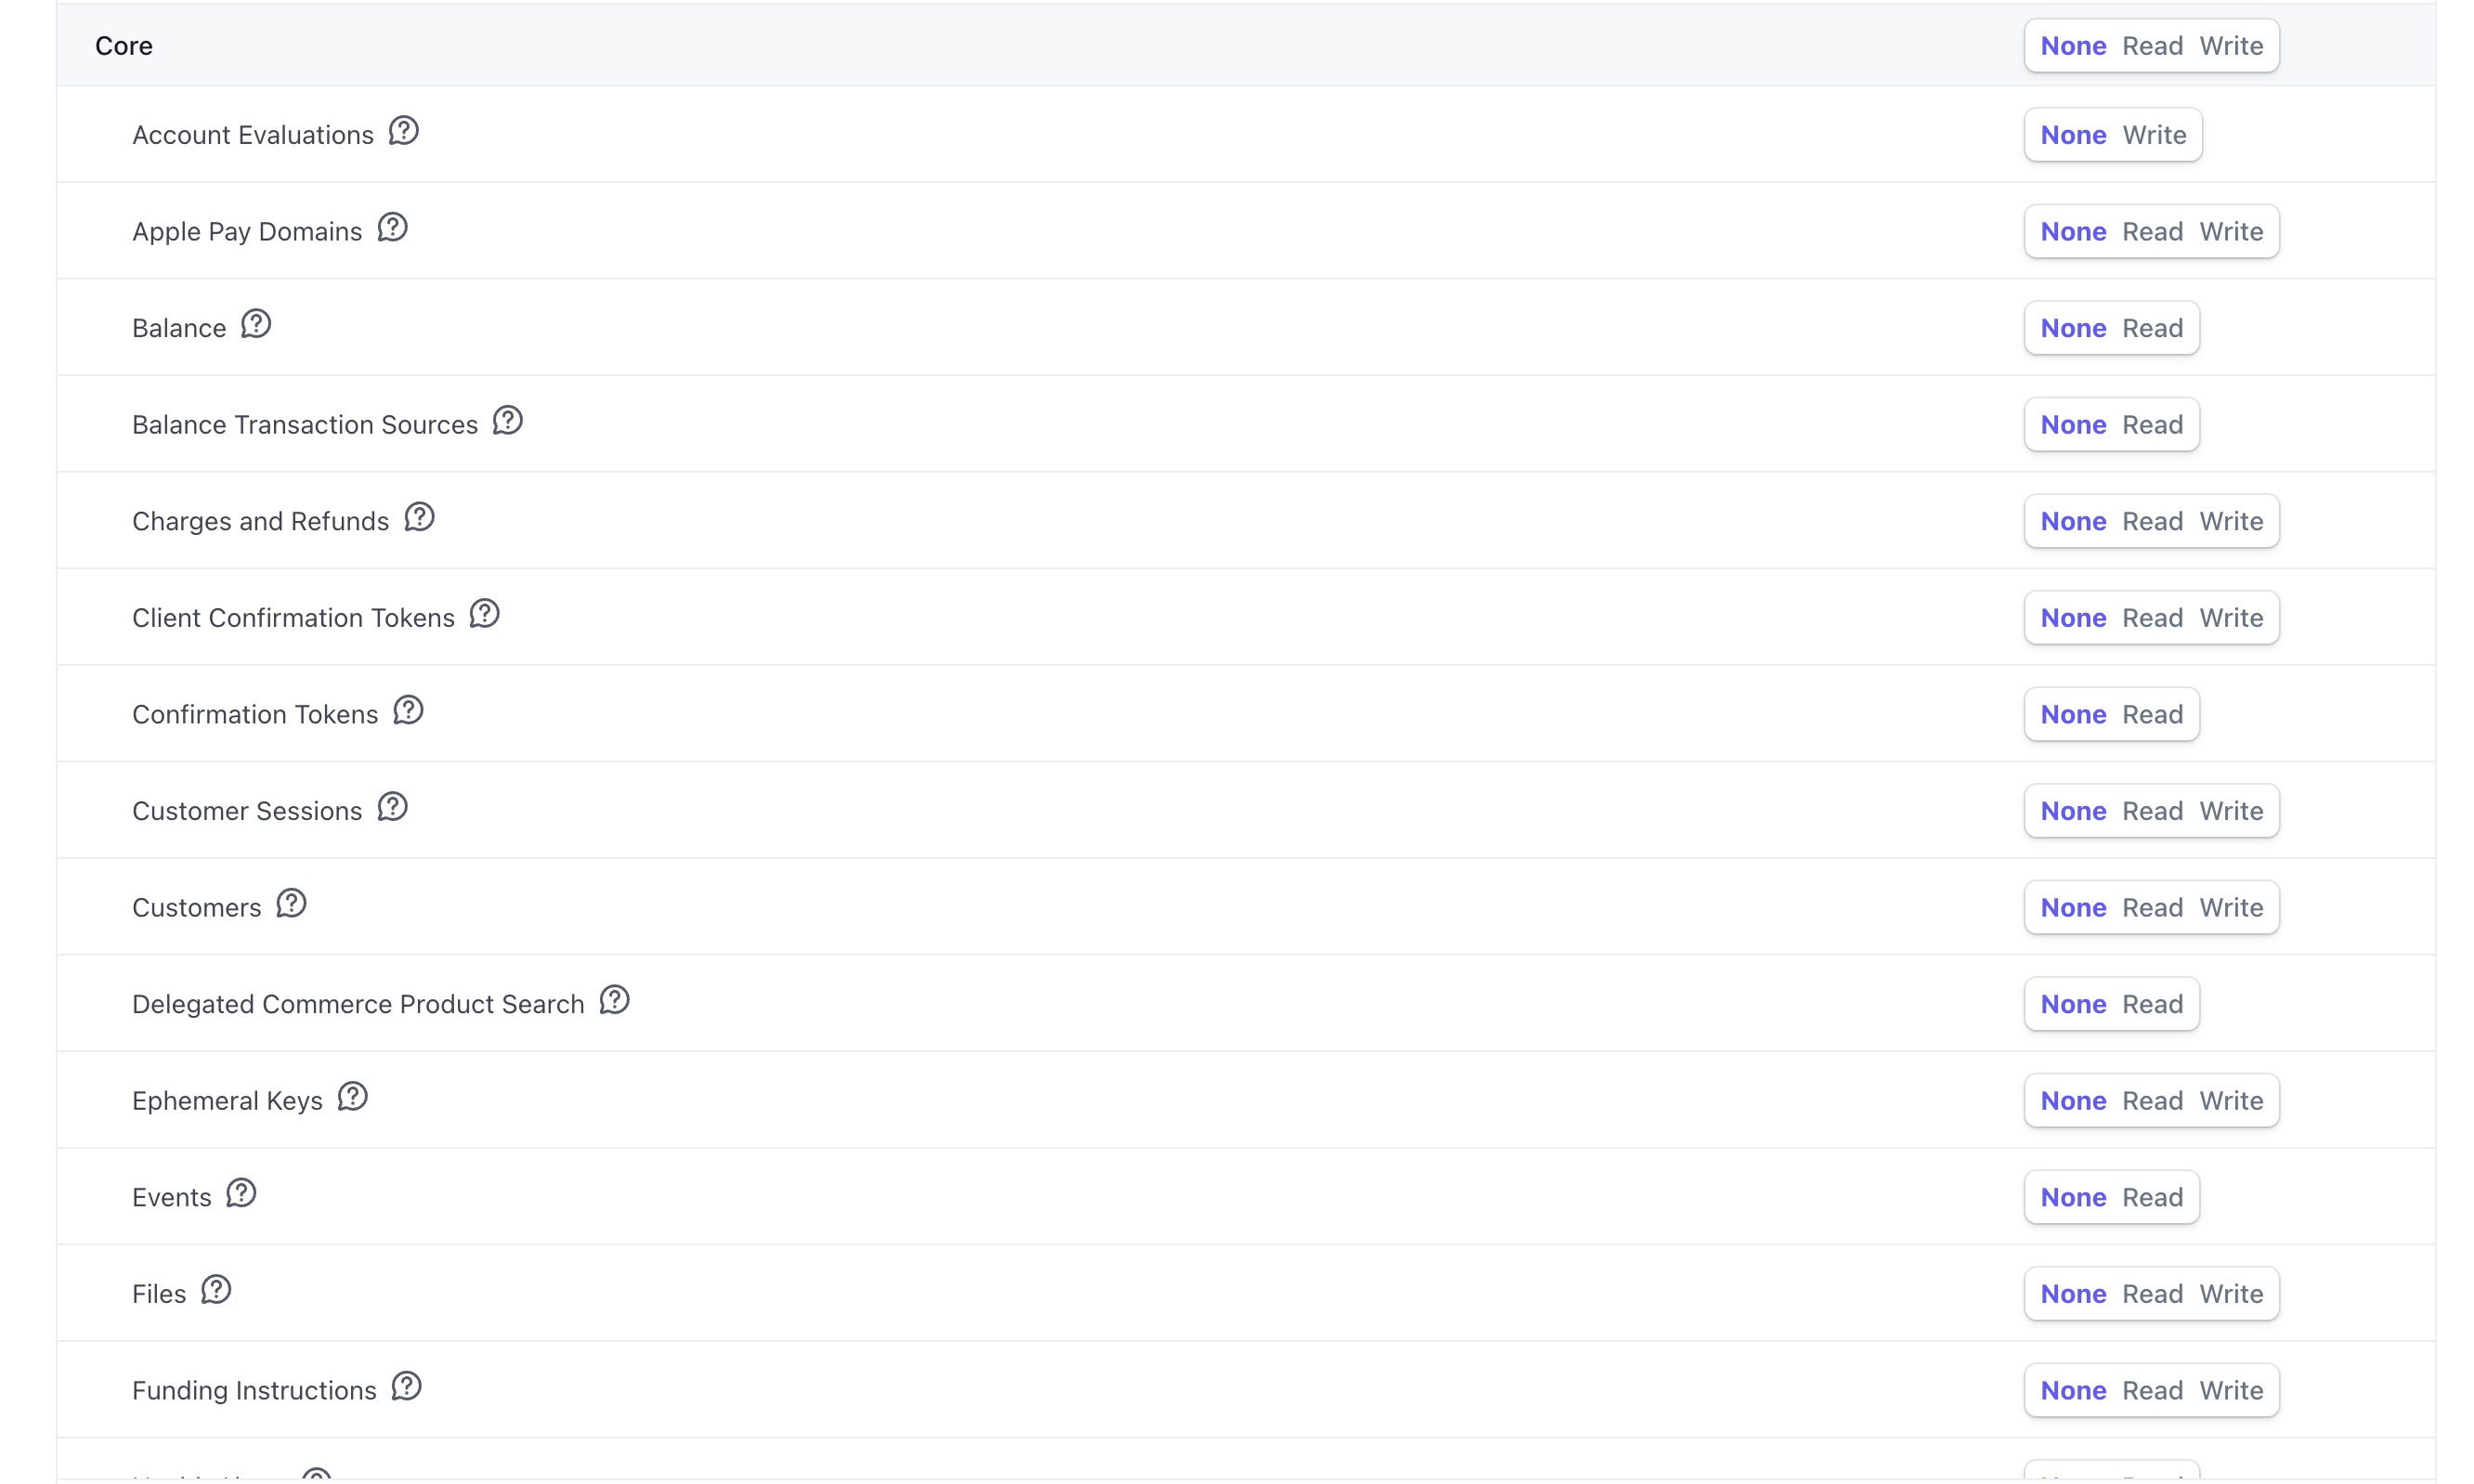
Three things to know about this screen:
- Everything starts at None. A new restricted key grants nothing until you select permissions, so you're building up from zero rather than trimming down.
- Levels are per resource. Read covers
GET; Write coversPOST/DELETEand includes Read. - Not every resource offers all three. Some are read-only (for example Balance and Events offer only None and Read), and a few are write-only (Account Evaluations).
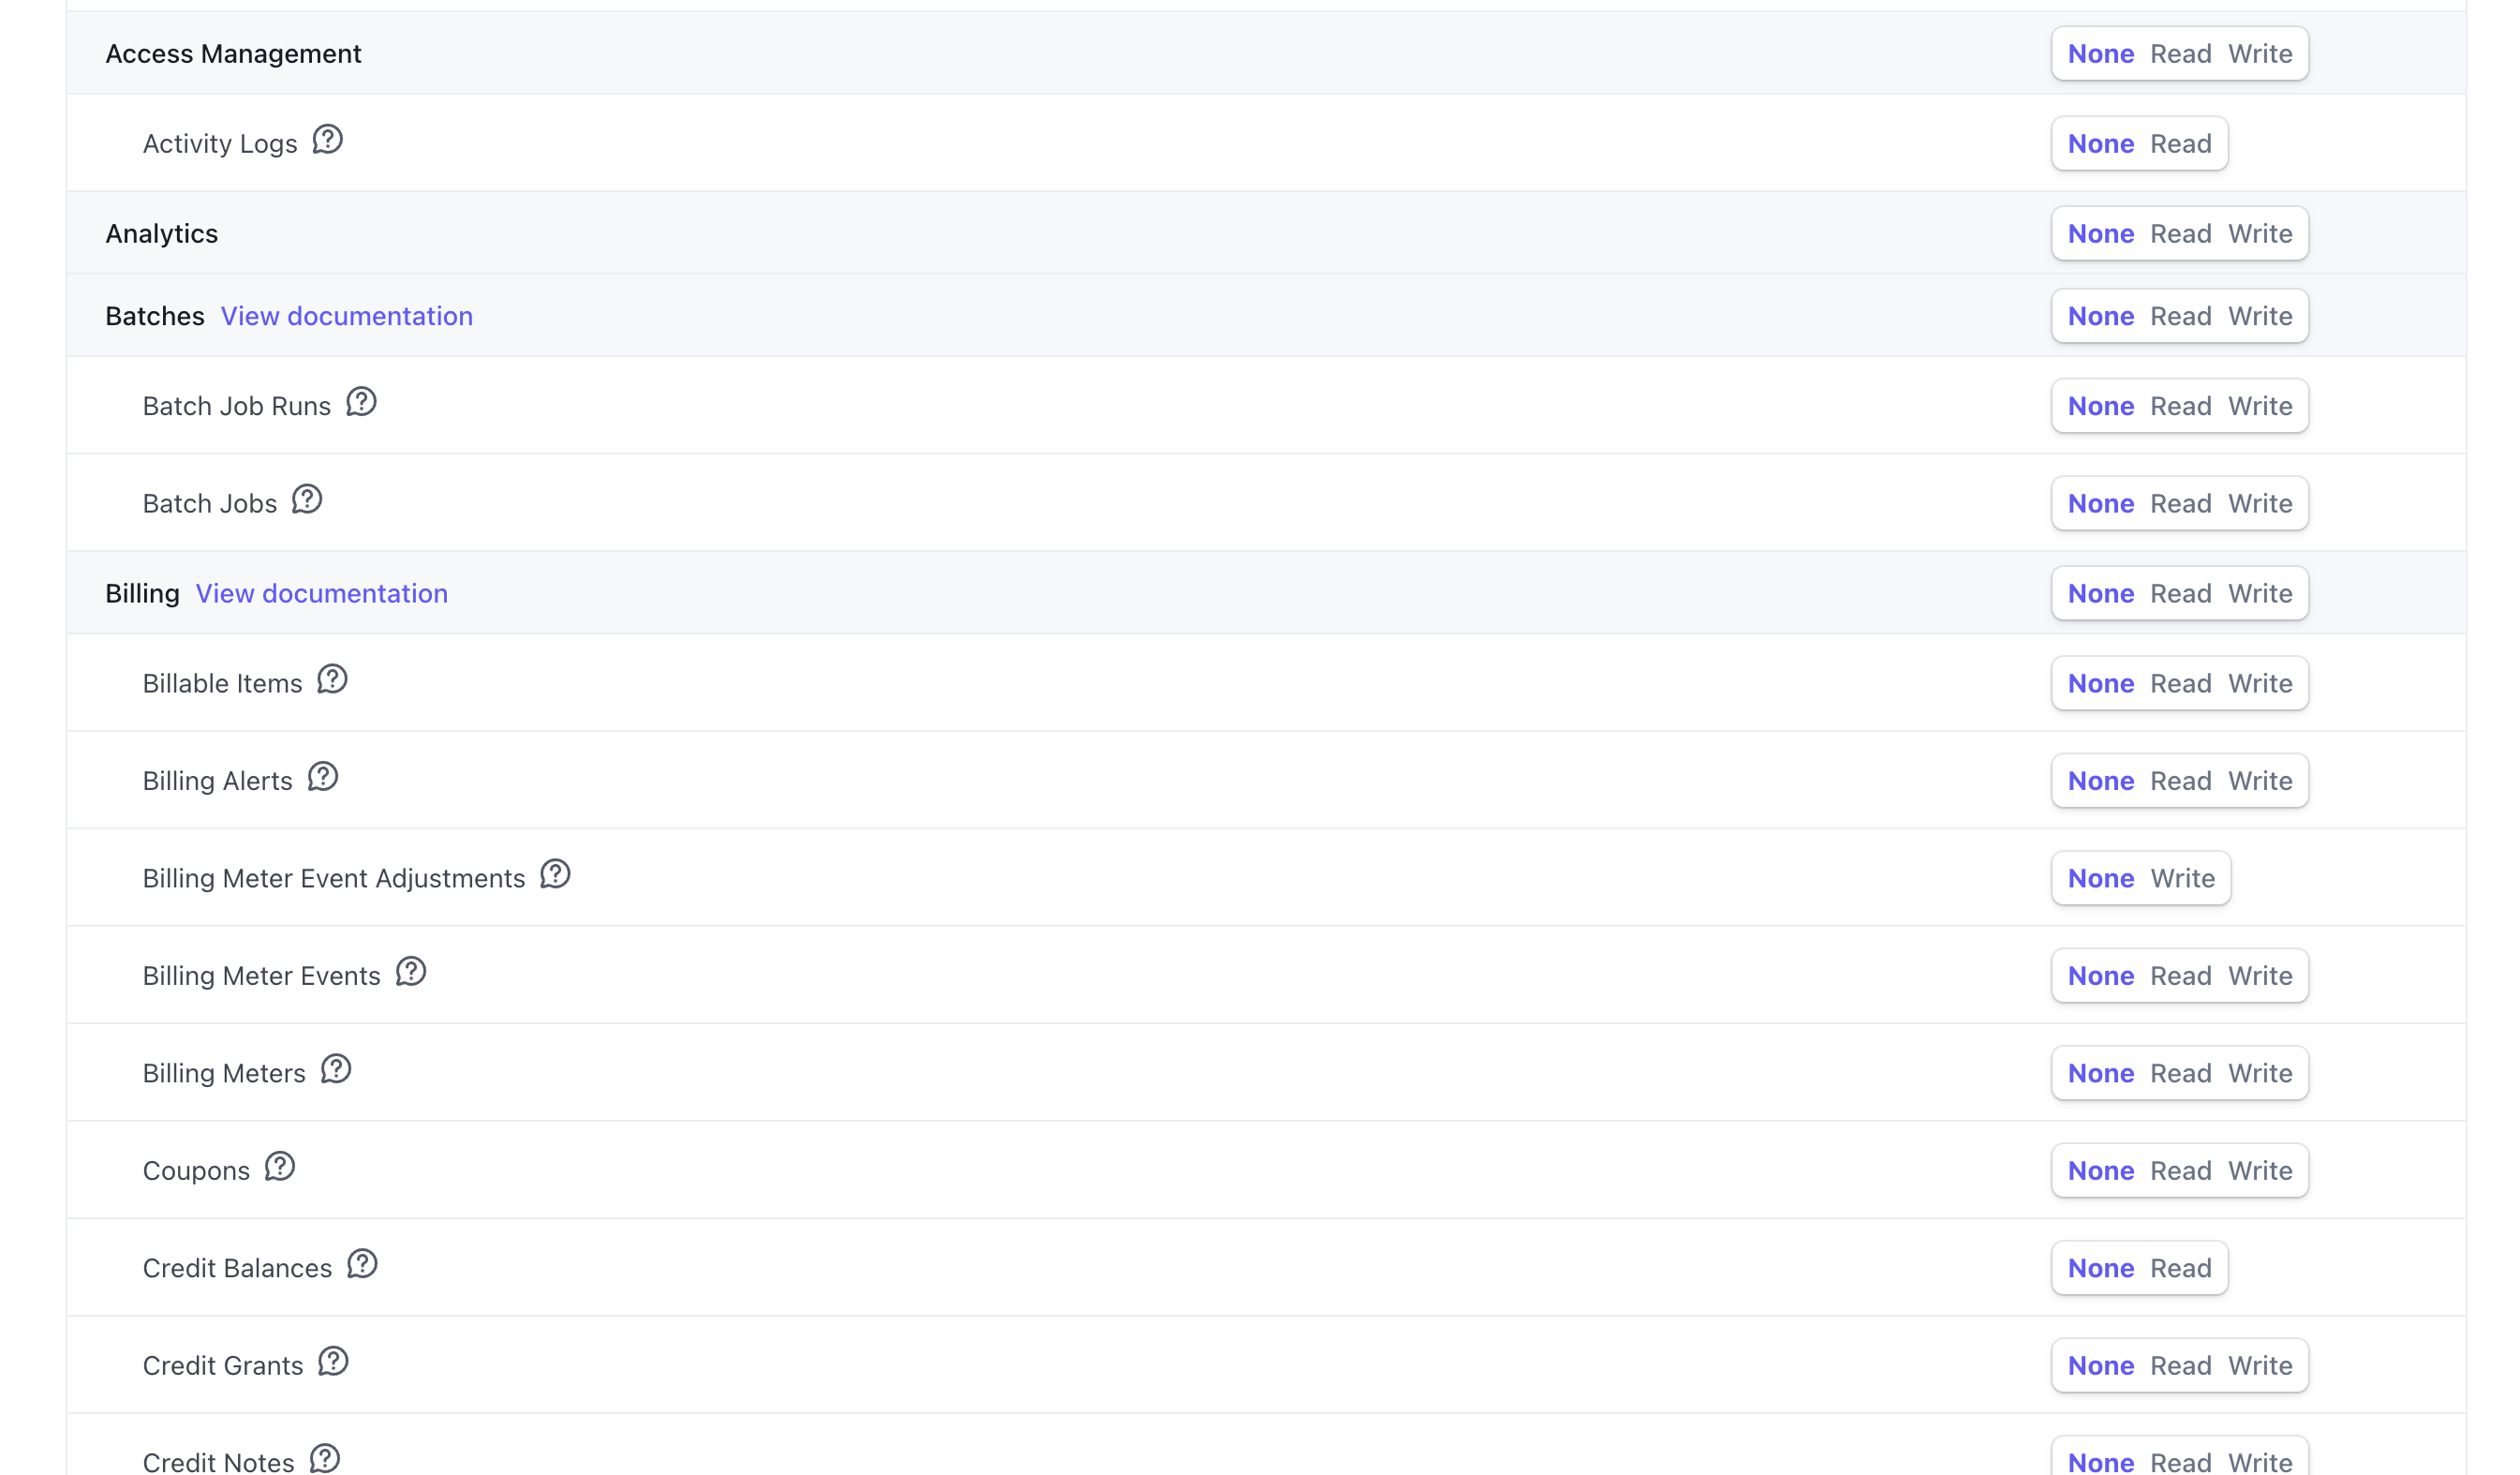
For investigation work, grant Read on the resources your agents need. Useful starting points in Core are Charges and Refunds, Customers, Balance, Balance Transaction Sources, and Events; billing investigations also want the relevant resources under Billing. Add only what you need — this is a starting point, not a required list.
Only grant Write on a resource if you intend Bicycle to modify it through the ACTION capability.
If your account is a Connect platform, this screen also lets you set permissions for connected accounts. Configure those if Bicycle will query a connected account.
Copy the key
Click Create key and complete two-factor verification. Copy the key immediately — Stripe does not show it again. Store it in your organization's secrets manager.
Setup in Bicycle (API key)
Choose API key as the connector method
In Bicycle, go to Connectors, find Stripe, and click + Connect. On Select method, choose API key (Manually connect your API key), then click Next.
Enter the credentials
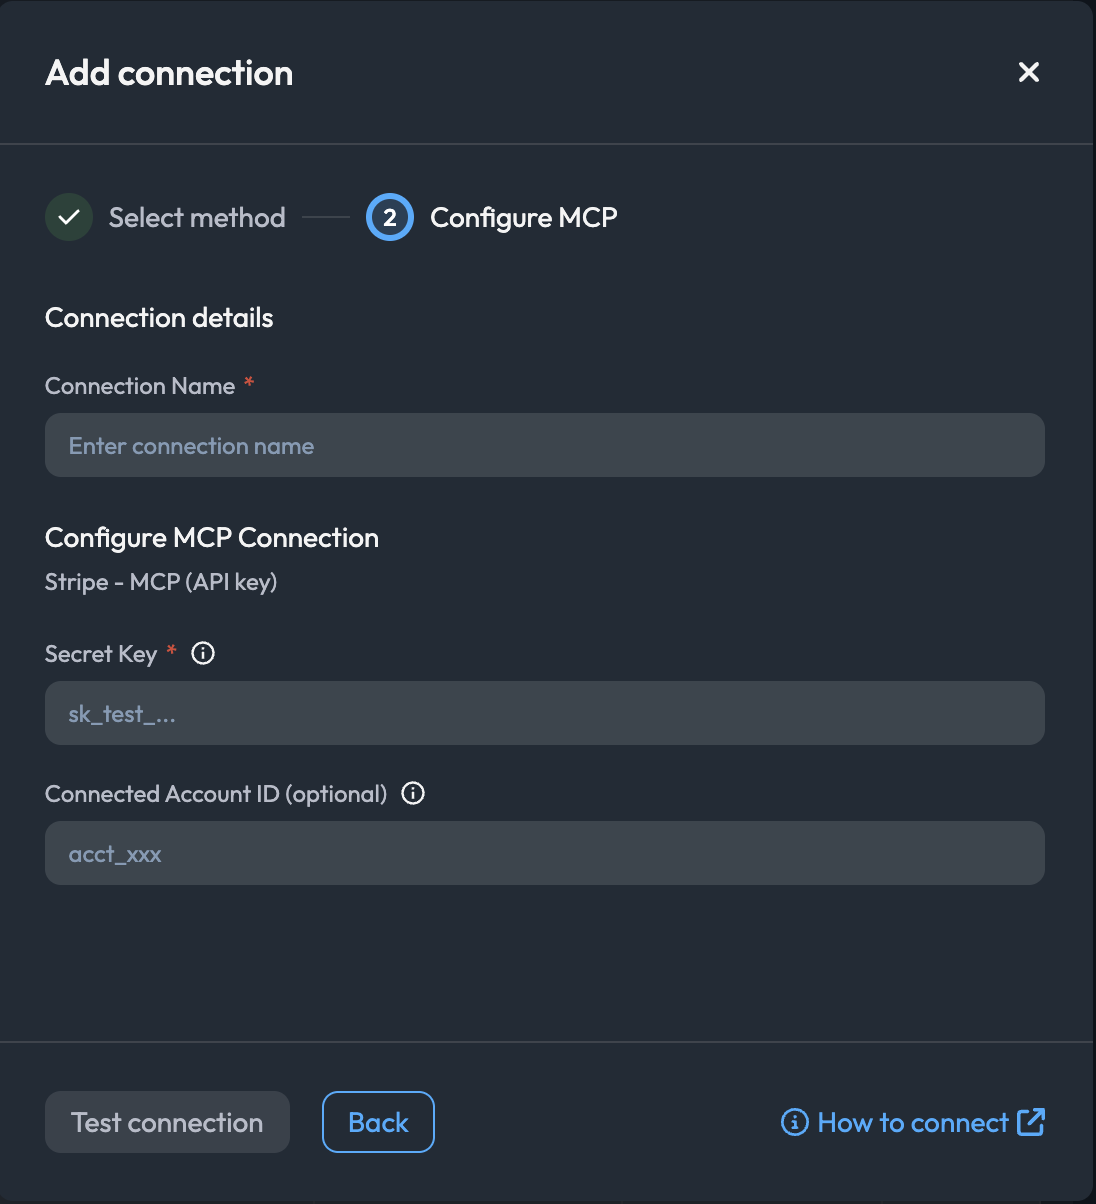
On Configure MCP, the subtitle reads Stripe - MCP (API key). Hover the ⓘ icon beside either field for inline help.
Connection NameRequiredA name identifying the Stripe account and environment, for example Stripe Live — acme.
Secret KeyRequiredYour Stripe secret key (sk_test_… / sk_live_…) or restricted API key (rk_test_… / rk_live_…). Stored encrypted and masked as a password field.
Connected Account ID (optional)Only for Connect platforms querying a connected account's data. Must begin with acct_ — Stripe's MCP server validates this and fails to start otherwise. Leave blank to query your own account.
Test the connection
Click Test connection — it stays disabled until the connection name and secret key are filled. Bicycle starts the Stripe MCP server with your key and lists the tools it discovers. On success you'll see Connection verified successfully and Discovered Tools.
Save the connection
Click Save connection. Bicycle shows Connection successfully added! with the connection name, ID, and method (API key). Click Close to return to the Connectors page.
Sandbox and live mode
Stripe treats the two environments as separate for both MCP access and credentials:
- Allow MCP access through OAuth is set per environment under Settings → Team and security → MCP access.
- Keys are environment-specific:
sk_test_…/rk_test_…for sandbox,sk_live_…/rk_live_…for live. - OAuth sessions and their revocation are environment-scoped.
Create a separate Bicycle connection per environment and name them so the environment is obvious. Validate against a sandbox first, then create the live connection.
Things to know before you connect
- OAuth access is tied to the authorizing user. It is capped by that person's Stripe role — Stripe states access "is limited to the member's role". If their role changes or their access is removed, the connection's effective access changes too.
- Permissions are chosen at authorize time, not in Bicycle. For OAuth, the consent screen is the only place to set them. To change them later, reconnect and pick different levels.
- Connected accounts require an API key. Stripe does not support OAuth for Connect connected-account calls, which is why Connected Account ID appears only on the API key method.
- One key per service. Stripe recommends a separate key per integration so a compromise has limited blast radius and rotating Bicycle's key never disturbs other systems.
- Tool selection is not configurable. Earlier versions of Stripe's MCP server accepted a
--toolsflag to expose a subset; that flag has been removed. Constrain access with OAuth permissions or restricted-key permissions instead. - Write access is real. With ACTION enabled and write permissions granted, Bicycle can create refunds and change subscriptions, invoices, prices, and coupons. Keep it read-only if you only need investigation.
Troubleshooting
| Error or symptom | Likely cause | Fix |
|---|---|---|
| OAuth fails, or Stripe refuses the authorization | Allow MCP access through OAuth is off for that environment | A Stripe admin enables it under Settings → Team and security → MCP access, in the same environment you're connecting |
| The popup never opens | Browser pop-up blocker | Allow pop-ups for the Bicycle app and click Go to OAuth again |
| Go to OAuth or Test connection is greyed out | Required fields are empty | Fill in the connection name, and the secret key for the API key method |
| You wait too long on the consent screen | Bicycle's OAuth request is valid for 10 minutes | Restart the connection and complete authorization promptly |
| Authorized successfully, but tools can't read anything | Every group was left at None on the consent screen | Reconnect via OAuth and set Read on the groups you need |
| Connected to the wrong Stripe account or environment | The consent screen's account card wasn't checked | Reconnect and use Switch account to pick the right one |
| Server fails to start with a key-prefix error | A publishable key (pk_…) or malformed value was pasted | Use a key beginning with sk_ or rk_ from Developers → API keys |
Server fails to start complaining the account must start with acct_ | Connected Account ID holds something else | Enter the acct_… ID, or clear the field to query your own account |
| Authentication failed / unauthorized | Key revoked, rolled, or from the wrong environment | Create a new key in the correct environment and update the connection |
| Tools appear, but specific reads return nothing or fail | Restricted key lacks Read on that resource | Edit the key's permissions in Stripe, or create a new key covering what you need |
| Writes fail while reads succeed | No Write permission granted, or the connection has no ACTION capability | Grant Write on those resources and confirm the connection includes ACTION |
| Live data missing but sandbox works | Connected with sandbox credentials | Enable MCP access in live mode and create a separate live connection |
| Connection stops working after previously succeeding | OAuth session revoked in Stripe, or the API key was rolled | Reconnect via OAuth, or paste the new key |
Capabilities
| Capability | Description |
|---|---|
| CAUSE | Read payments, subscriptions, invoices, customers, disputes, payouts, and balance data as investigative evidence |
| ACTION | Create refunds and create or update Stripe objects such as subscriptions, invoices, prices, coupons, and payment links, subject to the granted permissions |
What's next?
Now that Stripe is connected, you can:
- Use payment and billing data as evidence during root-cause analysis — correlate failed payments, disputes, and subscription churn with product and infrastructure signals
- Let Bicycle act on Stripe when the connection includes ACTION, such as issuing a refund as a remediation step
- Combine Stripe with your other connected sources so one investigation spans revenue and operational data